Set up a RADIUS Server on Windows Server 2019 for 802.1X Wireless Connections
In this post I will show how to set up a RADIUS server on Windows Server 2019 to provide 802.1X Wireless Connections through wireless access points.
Actually I want to set up a RADIUS server for IEEE 802.11 wireless networks, but its nearly the same as for wired (Ethernet) networks besides the NAS Port Type (type of media used) is IEEE 802.11 wireless instead of wired Ethernet.
IEEE 802.1X is an IEEE Standard for port-based Network Access Control (PNAC). It is part of the IEEE 802.1 group of networking protocols. It provides an authentication mechanism to devices wishing to attach to a LAN or WLAN.
Source: https://en.wikipedia.org/wiki/IEEE_802.1X
https://en.wikipedia.org/wiki/IEEE_802
- Set up the Network Policy and Access Services (NPAS) Server Role
- Configure your WLAN Access Points
- Configure Wireless Network (IEEE 802.11) Policies | Wi-Fi profiles
- Create Wi-Fi profiles using the System Center Configuration Manager (SCCM) or Microsoft Intune.
- Manage Wi-Fi profiles on local computer by using the netsh command
- Troubleshooting
- Links
Set up the Network Policy and Access Services (NPAS) Server Role
Microsoft’s implementation of a Remote Authentication Dial-In User Service (RADIUS) server is for Windows Server operating systems later than Windows Server 2003 the Network Policy and Access Services (NPAS) server role.
NPAS replaces the Internet Authentication Service (IAS) from Windows Server 2003.
Source: https://en.wikipedia.org/wiki/Network_Policy_Server
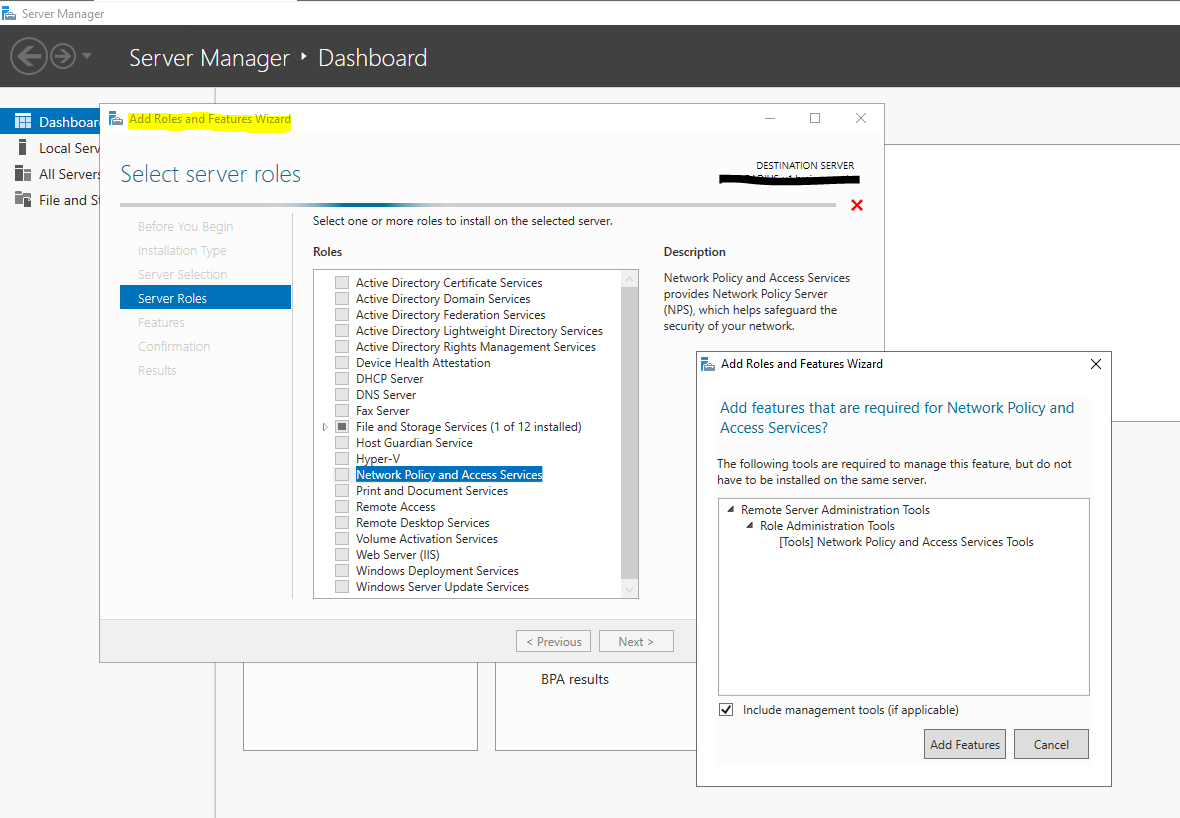
So first I will install the Network Policy and Access Services (NPAS) server role either on a domain controller or member server.

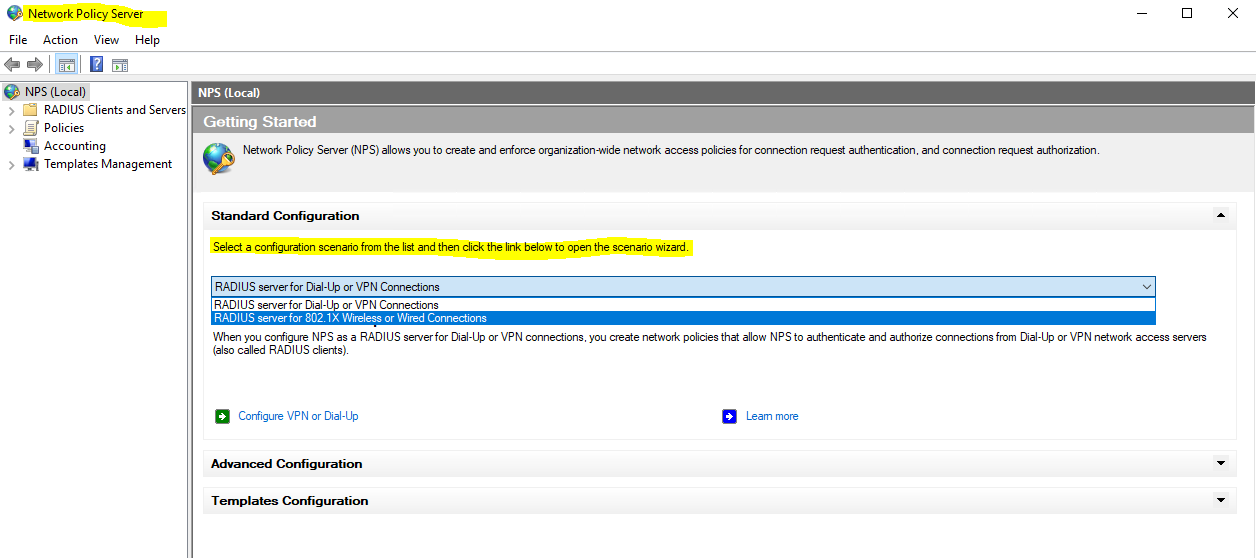
Now as the Network Policy and Access Services (NPAS) server role is installed you will have a new console named Network Policy Server.
Open the Network Policy Server console and select the RADIUS server for 802.1X Wireless or Wired Connections template to configure NPS by using the wizard.
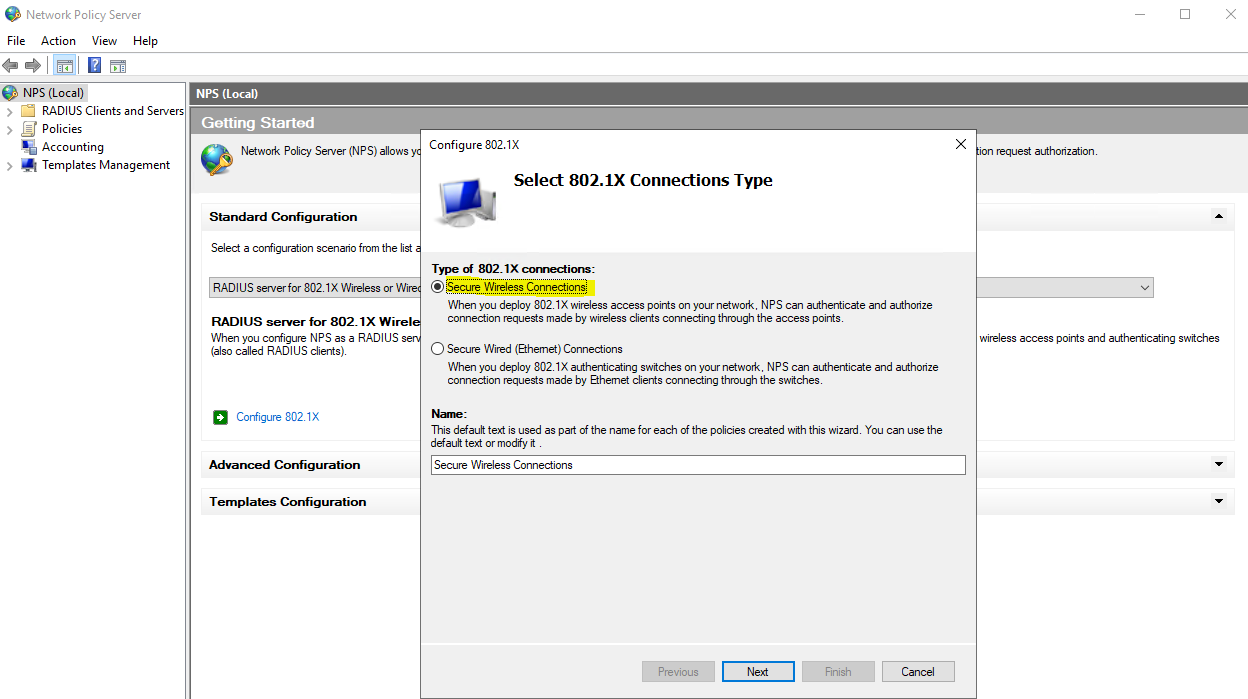
Click on Configure 802.1X to start the wizard.

Select Secure Wireless Connections
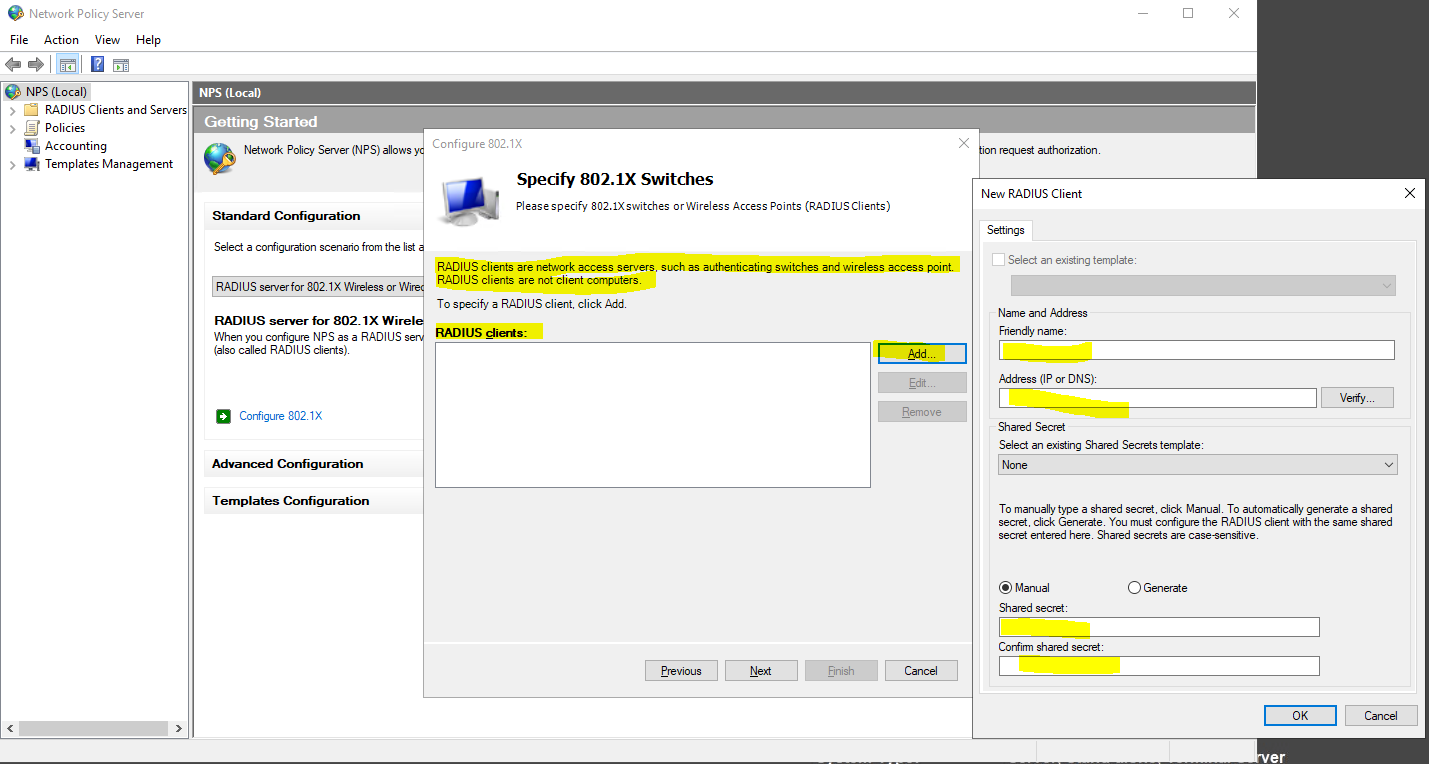
Here I need to add all my WLAN access points as RADIUS clients.
- Friendly name
- IP address or FQDN
- Shared secret
Use a unique RADIUS shared secret for each wireless AP unless you are planning to configure APs as RADIUS Clients in NPS by group. If you plan to configure APs by group in NPS, the shared secret must be the same for every member of the group. In addition, each shared secret you use should be a random sequence of at least 22 characters that mixes uppercase and lowercase letters, numbers, and punctuation.
Source: https://docs.microsoft.com/en-us/windows-server/networking/core-network-guide/cncg/wireless/e-wireless-access-deployment#to-configure-your-wireless-aps
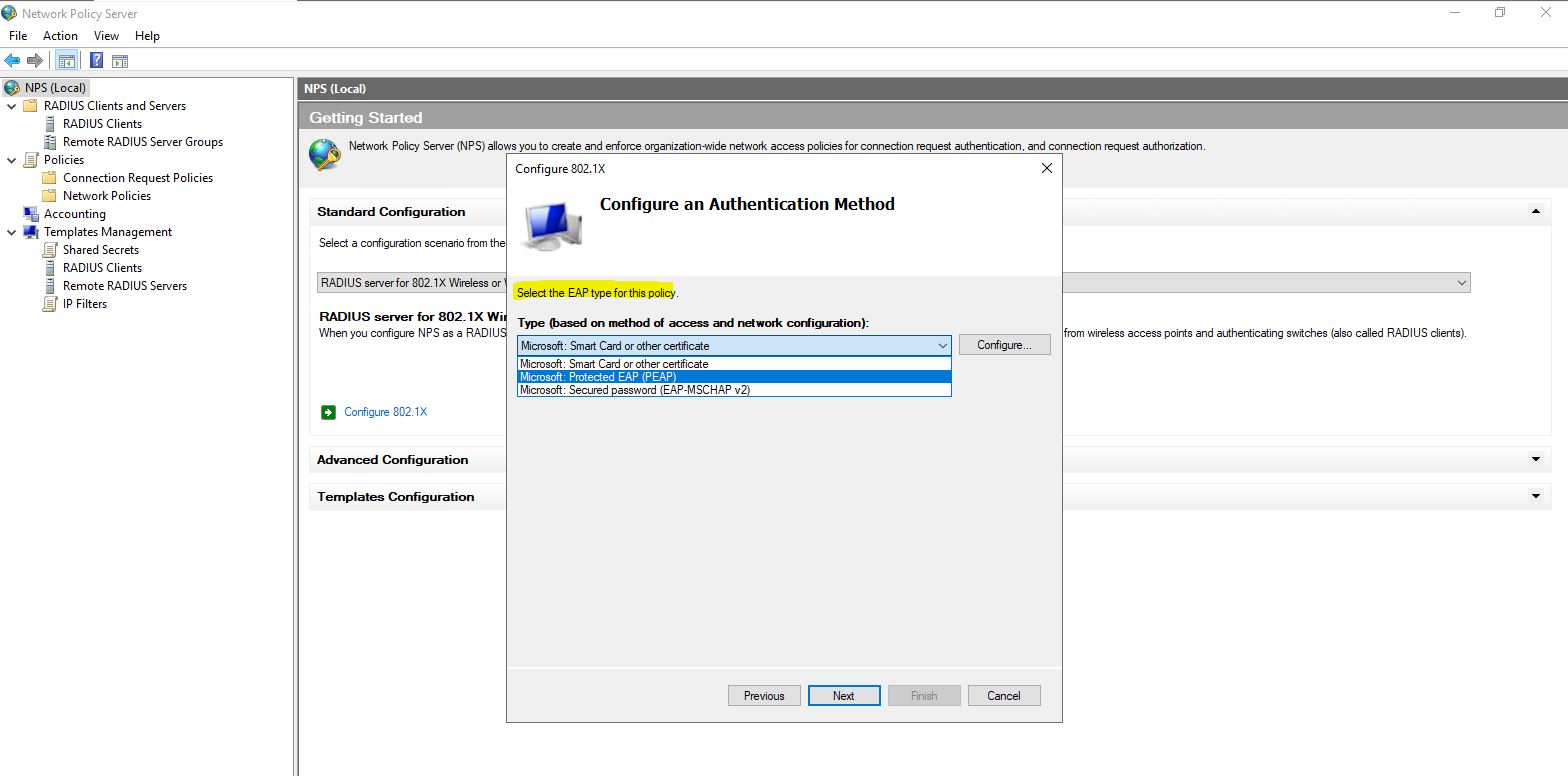
Configure an Authentication Method
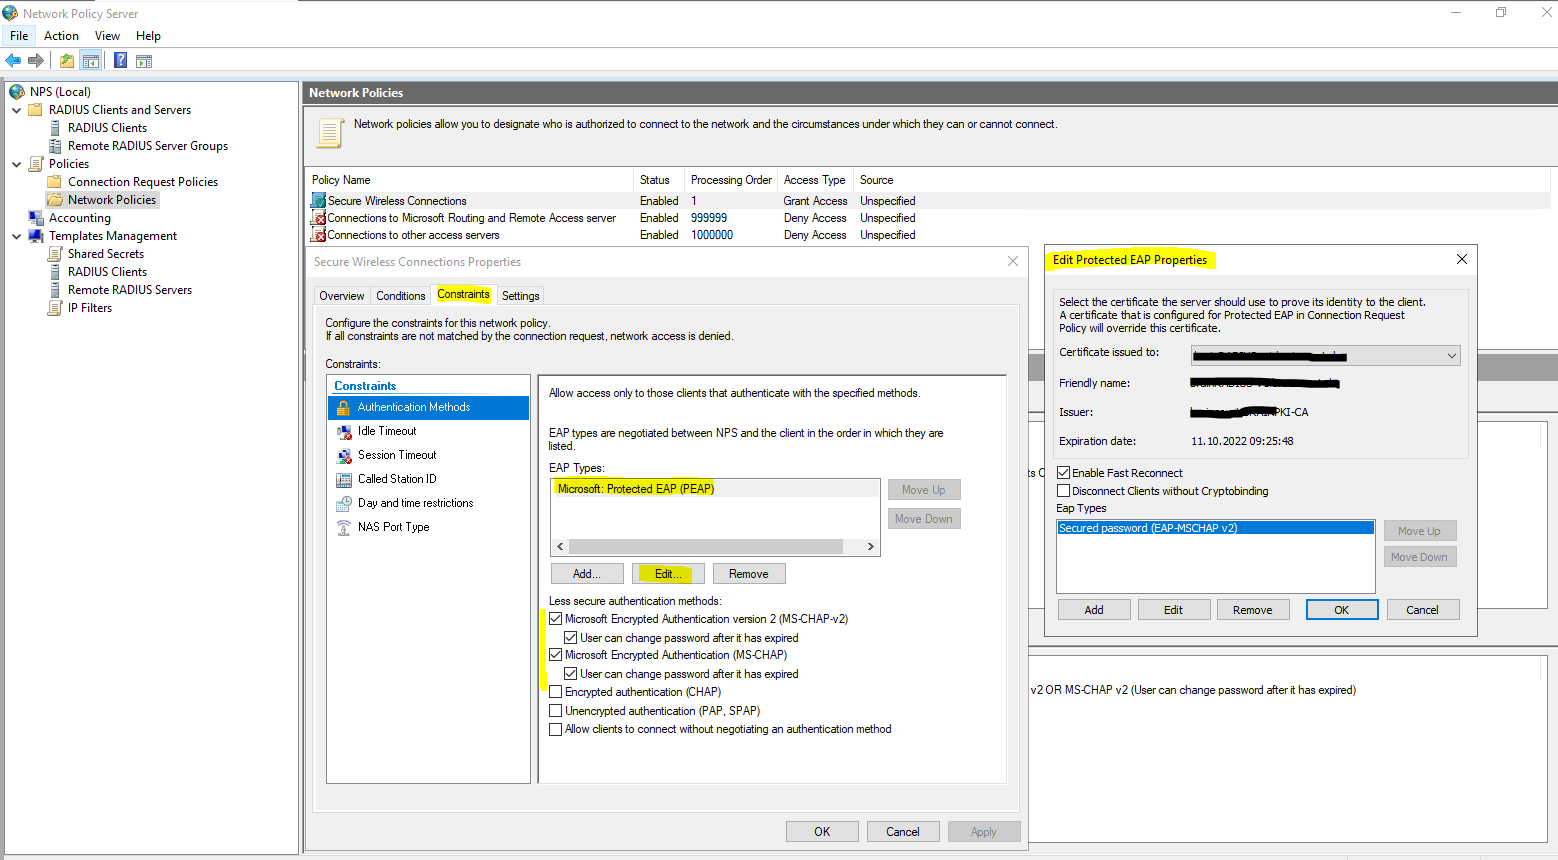
For authentication I will use the Protected EAP (PEAP) protocol.
Extensible Authentication Protocol (EAP)
https://en.wikipedia.org/wiki/Extensible_Authentication_Protocol
Protected Extensible Authentication Protocol (PEAP)
https://en.wikipedia.org/wiki/Extensible_Authentication_Protocol#PEAP
https://en.wikipedia.org/wiki/Protected_Extensible_Authentication_Protocol
Protected Extensible Authentication Protocol, Protected EAP, or simply PEAP
https://wiki.freeradius.org/protocol/EAP-PEAP
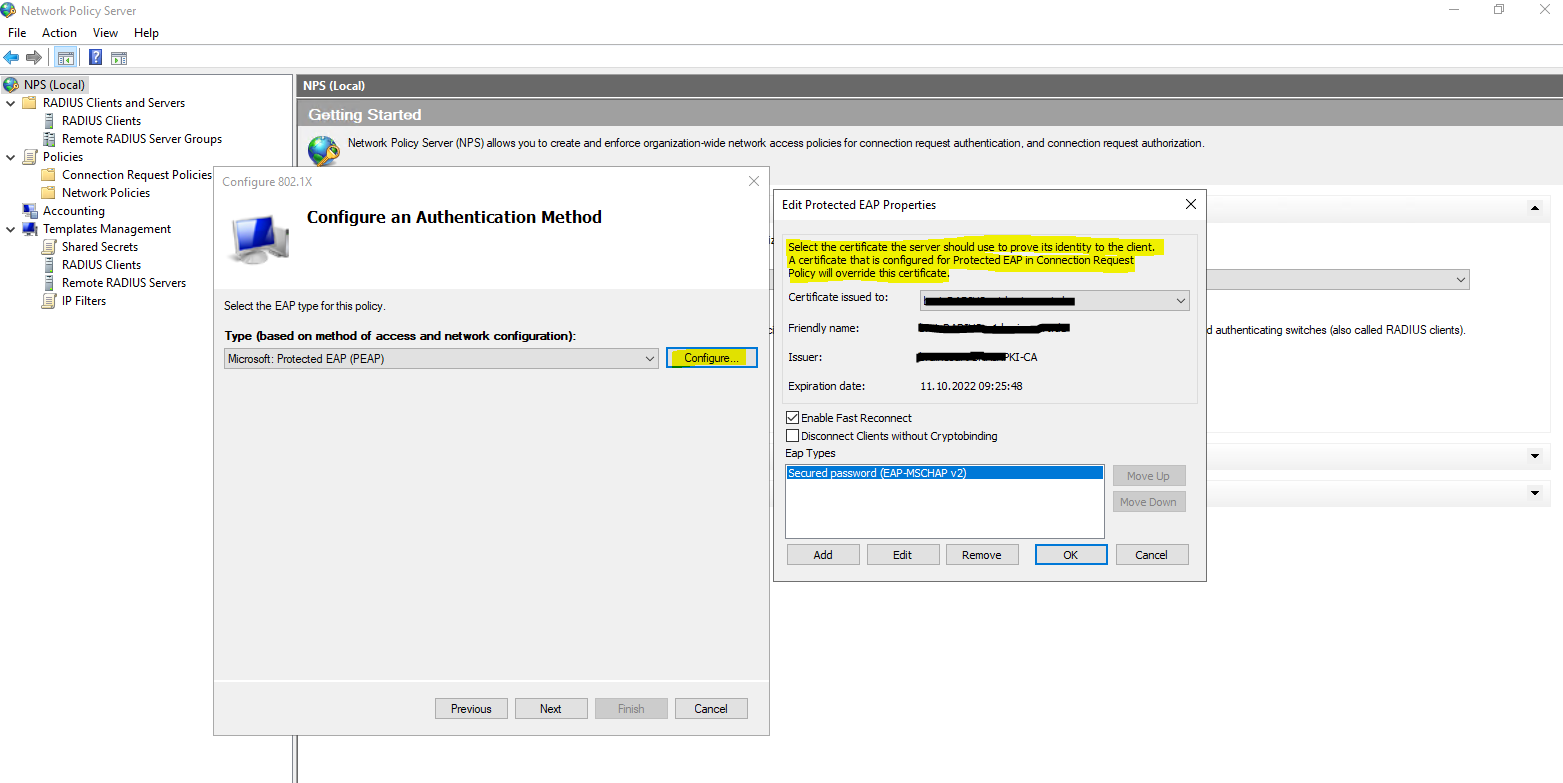
Click on Configure to select a certificate to prove the identity of the RADIUS server to the clients. You can use here the default computer certificate from your internal PKI.
The clients needs to trust that certificate, otherwise the user’s wont be able to connect to the wireless network.
Protected Extensible Authentication Protocol (PEAP)
https://en.wikipedia.org/wiki/Protected_Extensible_Authentication_Protocol
PEAP is similar in design to EAP-TTLS, requiring only a server-side PKI certificate to create a secure TLS tunnel to protect user authentication, and uses server-side public key certificates to authenticate the server.It then creates an encrypted TLS tunnel between the client and the authentication server. In most configurations, the keys for this encryption are transported using the server’s public key. The ensuing exchange of authentication information inside the tunnel to authenticate the client is then encrypted and user credentials are safe from eavesdropping.
PEAPv0/EAP-MSCHAPv2 is the most common form of PEAP in use, and what is usually referred to as PEAP. The inner authentication protocol is Microsoft’s Challenge Handshake Authentication Protocol, meaning it allows authentication to databases that support the MS-CHAPv2 format, including Microsoft NT and Microsoft Active Directory.
Source: https://en.wikipedia.org/wiki/Protected_Extensible_Authentication_Protocol#PEAPv0_with_EAP-MSCHAPv2
PEAP serves as a wrapper for MSCHAPv2, EAP-GTC, and EAP-TLS, which are used for user authentication.
Simplifying WPA2-Enterprise and 802.1x
Client / Supplicant
In order for a device to participate in the 802.1x authentication, it must have a piece of software called a supplicant installed in the network stack. The supplicant is necessary as it will participate in the initial negotiation of the EAP transaction with the switch or controller and package up the user credentials in a manner compliant with 802.1x. If a client does not have a supplicant, the EAP frames sent from the switch or controller will be ignored and the switch will not be able to authenticate.Fortunately, almost all devices we might expect to connect to a wireless network have a supplicant built-in. SecureW2 provides a 802.1x supplicant for devices that don’t have one natively.
Thankfully, the vast majority of device manufacturers have built-in support for 802.1x. The most common exceptions to this might be consumer gear, such as game consoles, entertainment devices or some printers. Generally speaking, these devices should be less than 10% of the devices on your network and are best treated as the exception rather than the focus.
Switch / Access Point / Controller
The switch or wireless controller plays an important role in the 802.1x transaction by acting as a ‘broker’ in the exchange. Until a successful authentication, the client does not have network connectivity, and the only communication is between the client and the switch in the 802.1x exchange.The switch/controller initiates the exchange by sending an EAPOL-Start packet to the client when the client connects to the network. The client’s responses are forwarded to the correct RADIUS server based on the configuration in the Wireless Security Settings. When the authentication is complete, the switch/controller makes a decision whether to authorize the device for network access based on the user’s status and possibly the attributes contained in the Access_Accept packet sent from the RADIUS server.
Source: https://www.securew2.com/solutions/wpa2-enterprise-and-802-1x-simplified
A detailed description about the EAP authentication exchange you will find in the RFC3748 section 2.
https://datatracker.ietf.org/doc/html/rfc3748#section-2
Successful mutual PEAP-MS-CHAP v2 authentication has two main parts:
- The client authenticates the NPS. During this phase of mutual authentication, the NPS sends its server certificate to the client computer so that the client can verify the NPS’s identity with the certificate. To successfully authenticate the NPS, the client computer must trust the CA that issued the NPS certificate. The client trusts this CA when the CA’s certificate is present in the Trusted Root Certification Authorities certificate store on the client computer.
- The NPS authenticates the user. After the client successfully authenticates the NPS, the client sends the user’s password-based credentials to the NPS, which verifies the user’s credentials against the user accounts database in Active Directory Domain Services (AD DS).
If the credentials are valid and authentication succeeds, the NPS begins the authorization phase of processing the connection request. If the credentials are not valid and authentication fails, NPS sends an Access Reject message and the connection request is denied.
The behavior requiring the client to validate the server certificate can be disabled, but disabling server certificate validation is not recommended in production environments.
The server running NPS performs authorization as follows:
- NPS checks for restrictions in the user or computer account dial-in properties in AD DS. Every user and computer account in Active Directory Users and Computers includes multiple properties, including those found on the Dial-in tab. On this tab, in Network Access Permission, if the value is Allow access, the user or computer is authorized to connect to the network. If the value is Deny access, the user or computer is not authorized to connect to the network. If the value is Control access through NPS Network Policy, NPS evaluates the configured network policies to determine whether the user or computer is authorized to connect to the network.
- NPS then processes its network policies to find a policy that matches the connection request. If a matching policy is found, NPS either grants or denies the connection based on that policy’s configuration.
If both authentication and authorization are successful, and if the matching network policy grants access, NPS grants access to the network, and the user and computer can connect to network resources for which they have permissions.
Keep in mind regarding the communication between the NPS server and client as described in both Microsoft articles about authentication and authorization above.
As mentioned further above in the great article from SECUREW2, the client cannot communicate directly with the RADIUS server to authenticate himself and the server, as it does not have network connectivity until a successful authentication. The communication between the client and RADIUS server is established through the access points (switches for wired networks), which will acting as a broker in the exchange between both.
Adding Users to allow access for the Network
Here I will add all groups which are allowed to access the network through my wlan access points.
For computer authentication you should create a security group which includes all computer accounts they should be able to authenticate against NPS and add it to your network policy (Conditions tab) as windows group. NPS uses then this policy to authorize the connection request.
Further each of those computers needs a computer certificate installed from your internal PKI (CA), which is by default published to the Enterprise NTAuth store.
The computers wlan profile also needs to be configured to enable computer authentication, I will show this further below in the section about configuring a group policy.
Btw. you can also use certificates from a third-party CA, but in that case you need to import the CA certificate into your Enterprise NTAuth store and the computer certificate needs to mapped to the computer account in Active Directory. About how you will find in the following article from Microsoft:
https://docs.microsoft.com/en-us/troubleshoot/windows-server/windows-security/import-third-party-ca-to-enterprise-ntauth-storeThe Enterprise NTAuth store is used by your Active Directory domain to determine which certification authorities to trust for issuing certificates that are used to authenticate and authorize a user or computer.
To check which CAs are stored in the Enterprise NTAuth store, you can use the PKI Tool (PKIVIEW). On your CA server open the tool pkiview.msc, right click on Enterprise PKI and select Manage AD Containers… . Here you will see in the tab NTAuthCertificates which CAs are still trusted.

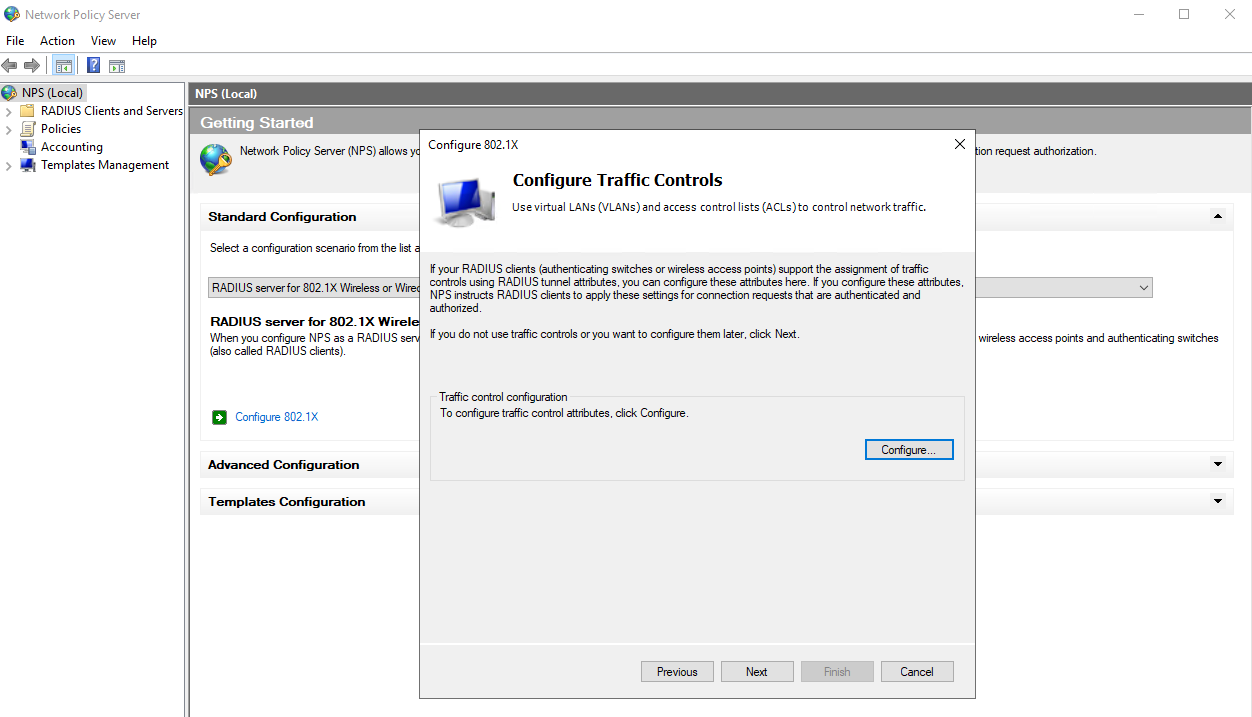
Configure Traffic Controls (RADIUS tunnel attributes)
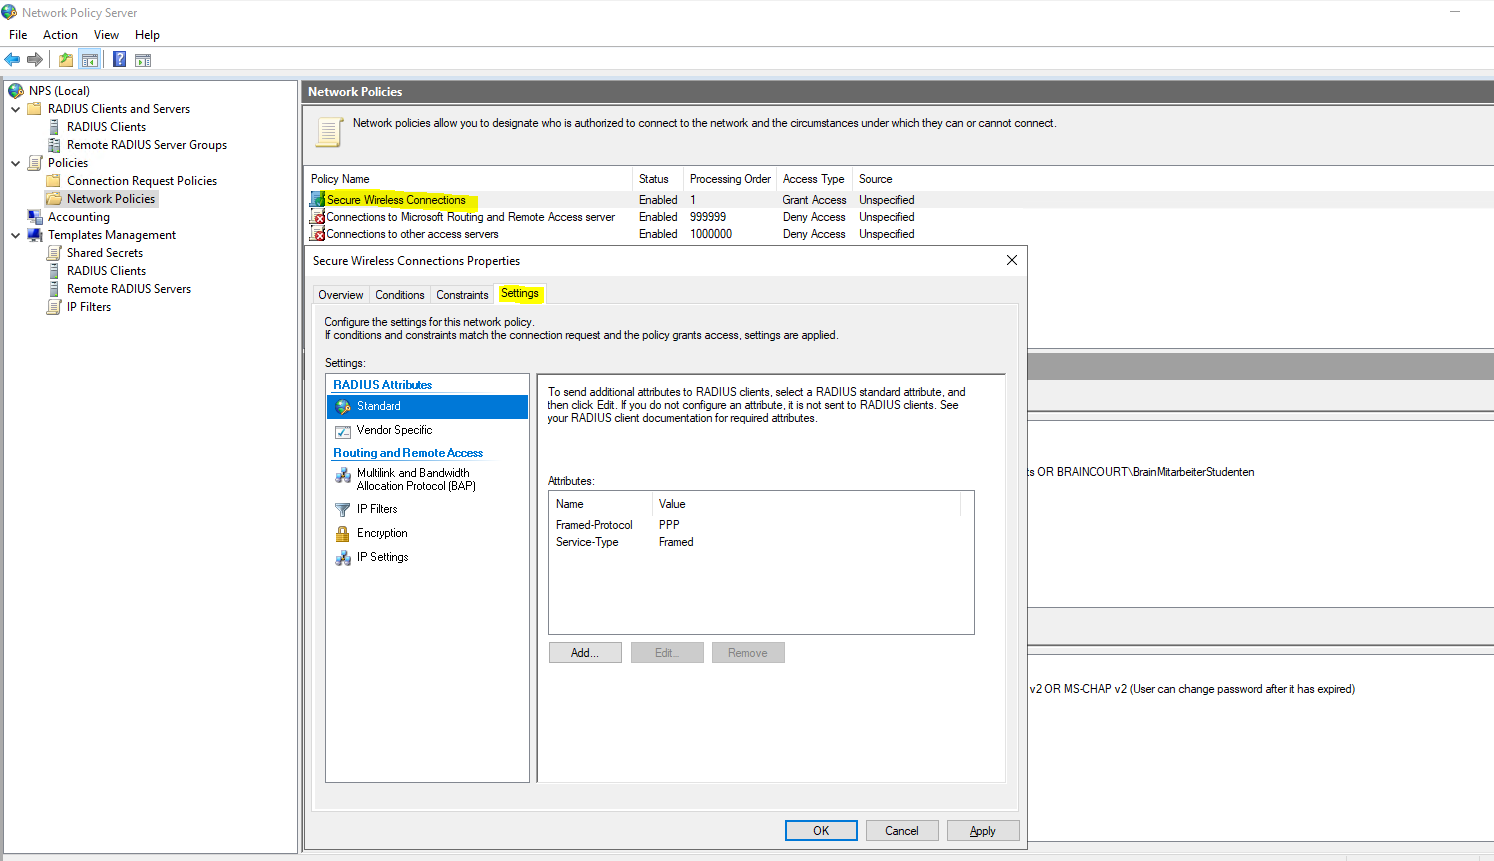
In the next dialog you can configure traffic control attributes (RADIUS tunnel attributes) to allow and deny traffic to user’s based on their assigned VLANs.
Configure Traffic Controls
Use virtual LANs (VLANs) and access control lists (ACLs) to control network traffic
https://docs.microsoft.com/en-us/windows-server/networking/technologies/nps/nps-np-configure#configure-nps-for-vlans
By using VLAN-aware network access servers and NPS in Windows Server 2016, you can provide groups of users with access only to the network resources that are appropriate for their security permissions. For example, you can provide visitors with wireless access to the Internet without allowing them access to your organization network.
You can change all of theses settings later directly in the NPS console.
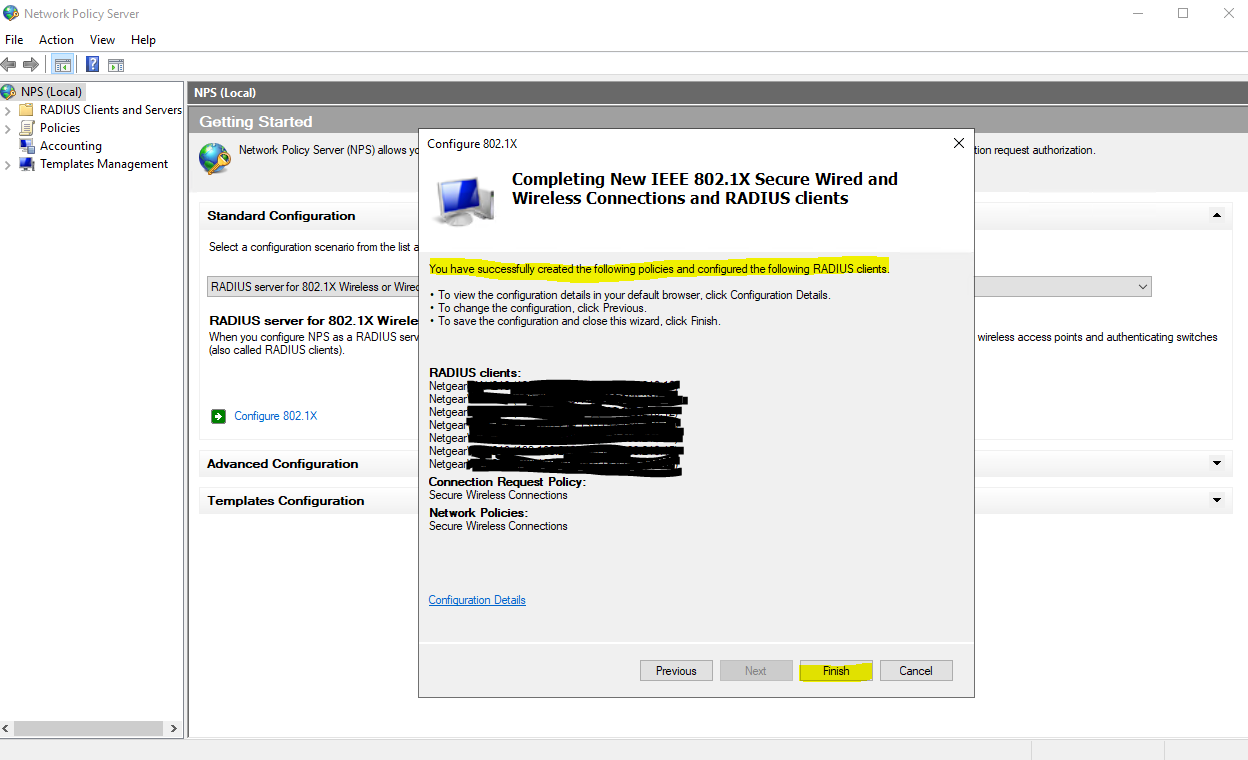
Here you can modify the RADIUS clients.

The wizard will create a Connection Request Policy and a Network Policy.
Connection Request Policies
https://docs.microsoft.com/en-us/windows-server/networking/technologies/nps/nps-crp-crpolicies
Connection request policies are sets of conditions and settings that allow network administrators to designate which Remote Authentication Dial-In User Service (RADIUS) servers perform the authentication and authorization of connection requests that the server running Network Policy Server (NPS) receives from RADIUS clients. Connection request policies can be configured to designate which RADIUS servers are used for RADIUS accounting.
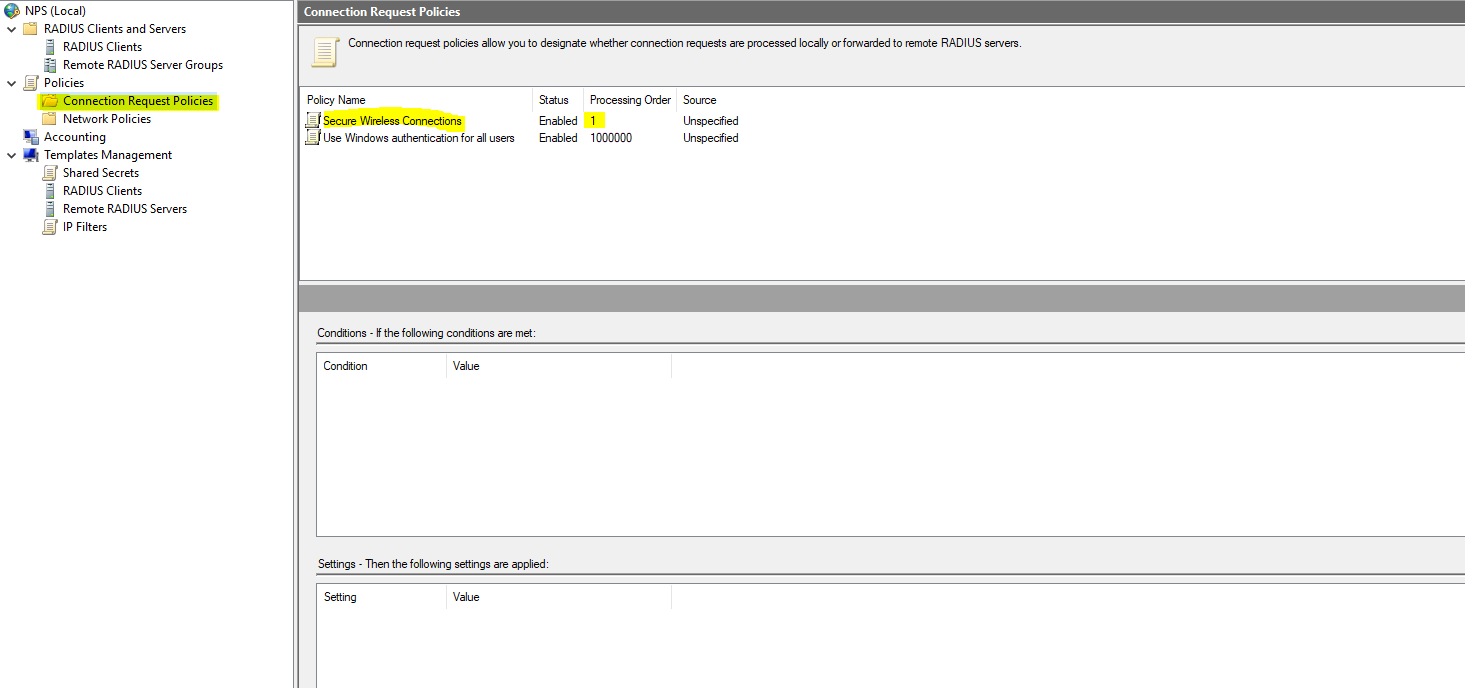
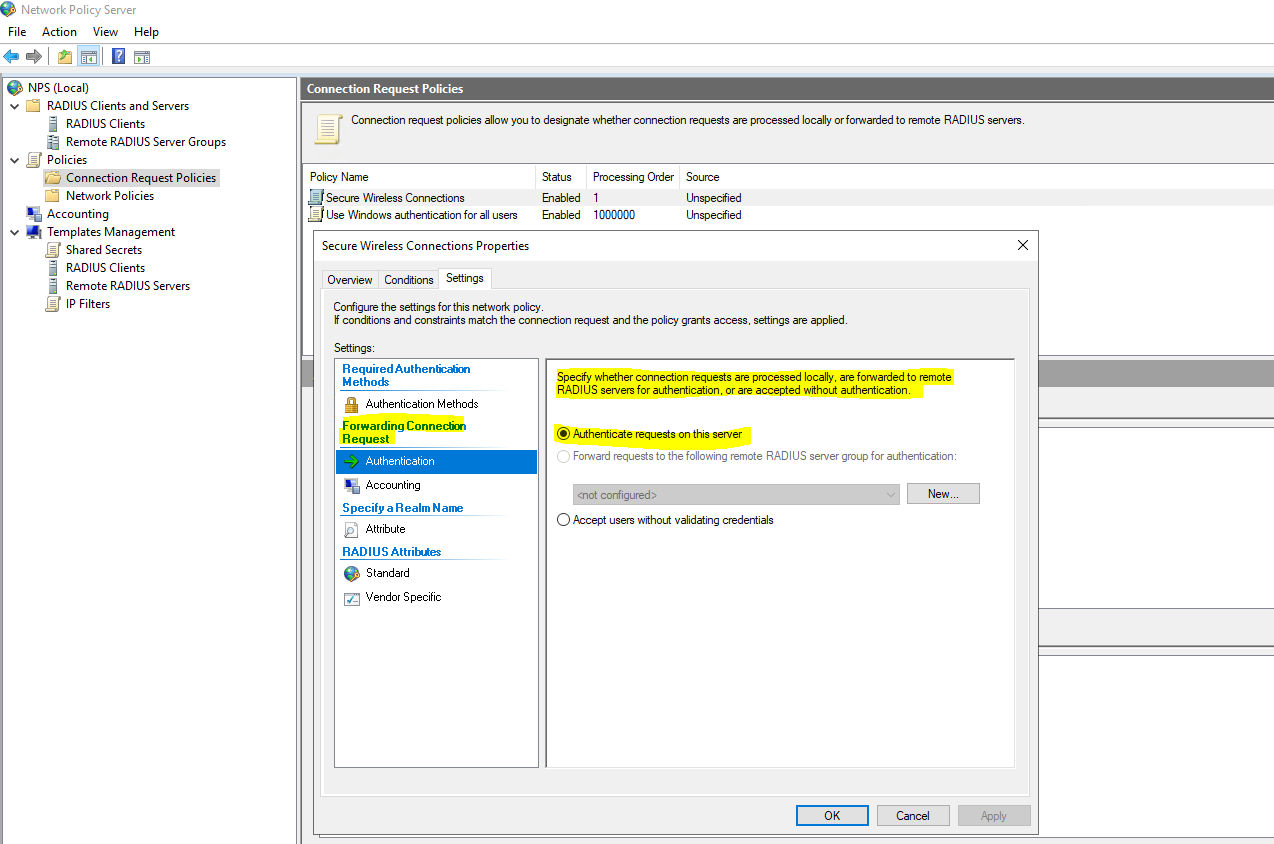
By default the wizard will set to process the authentication request locally on the server.
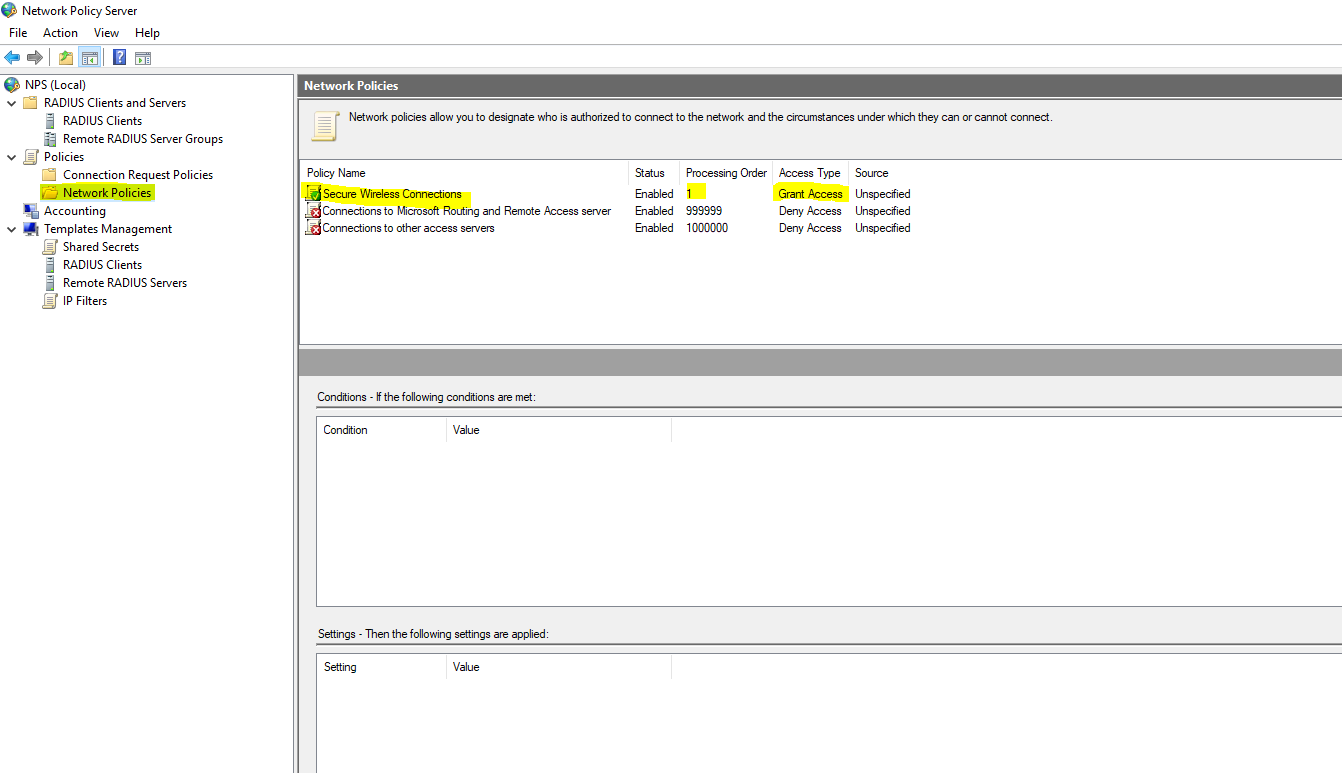
Network Policy
Network Policies
https://docs.microsoft.com/en-us/windows-server/networking/technologies/nps/nps-np-overview
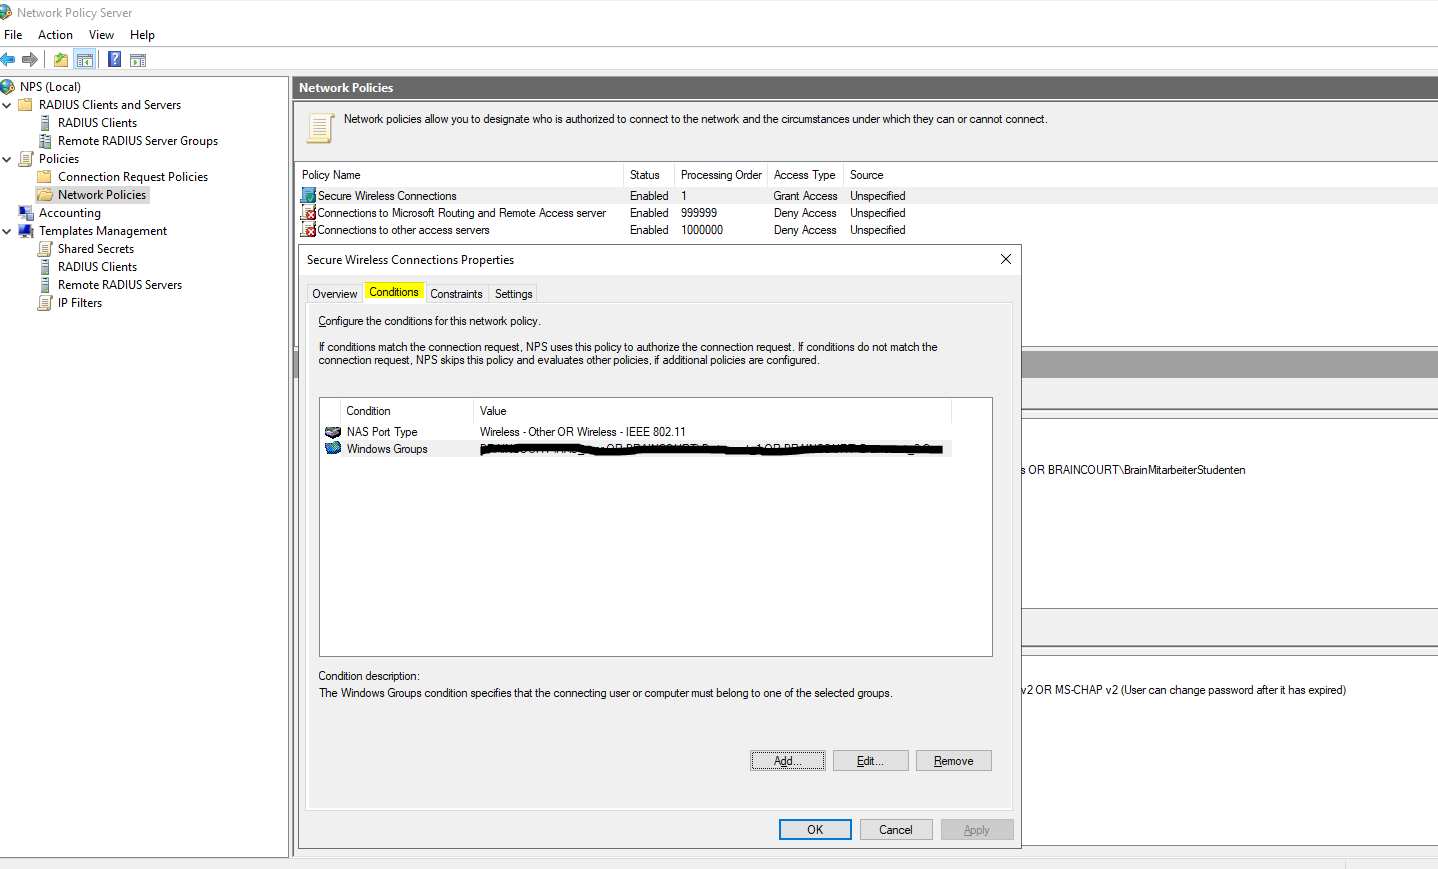
Network policies are sets of conditions, constraints, and settings that allow you to designate who is authorized to connect to the network and the circumstances under which they can or cannot connect.
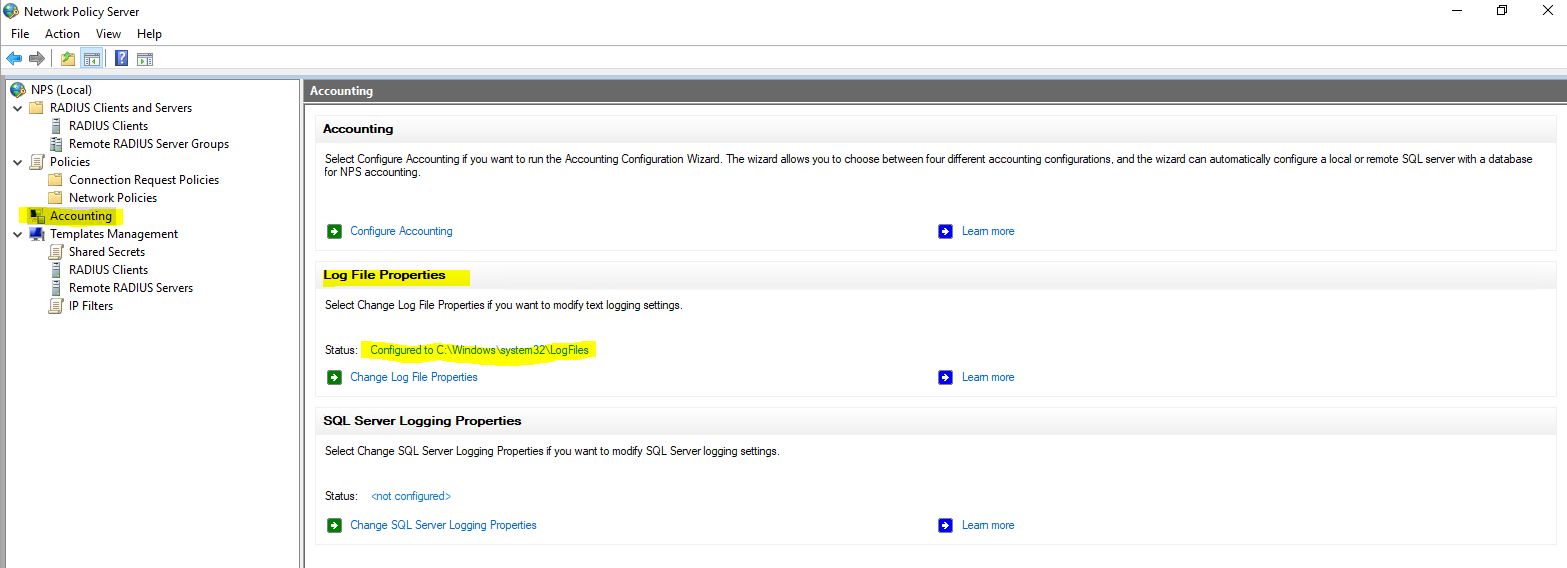
You can also configure Accounting for the NPS server.
Configure Network Policy Server Accounting
https://docs.microsoft.com/en-us/windows-server/networking/technologies/nps/nps-accounting-configure

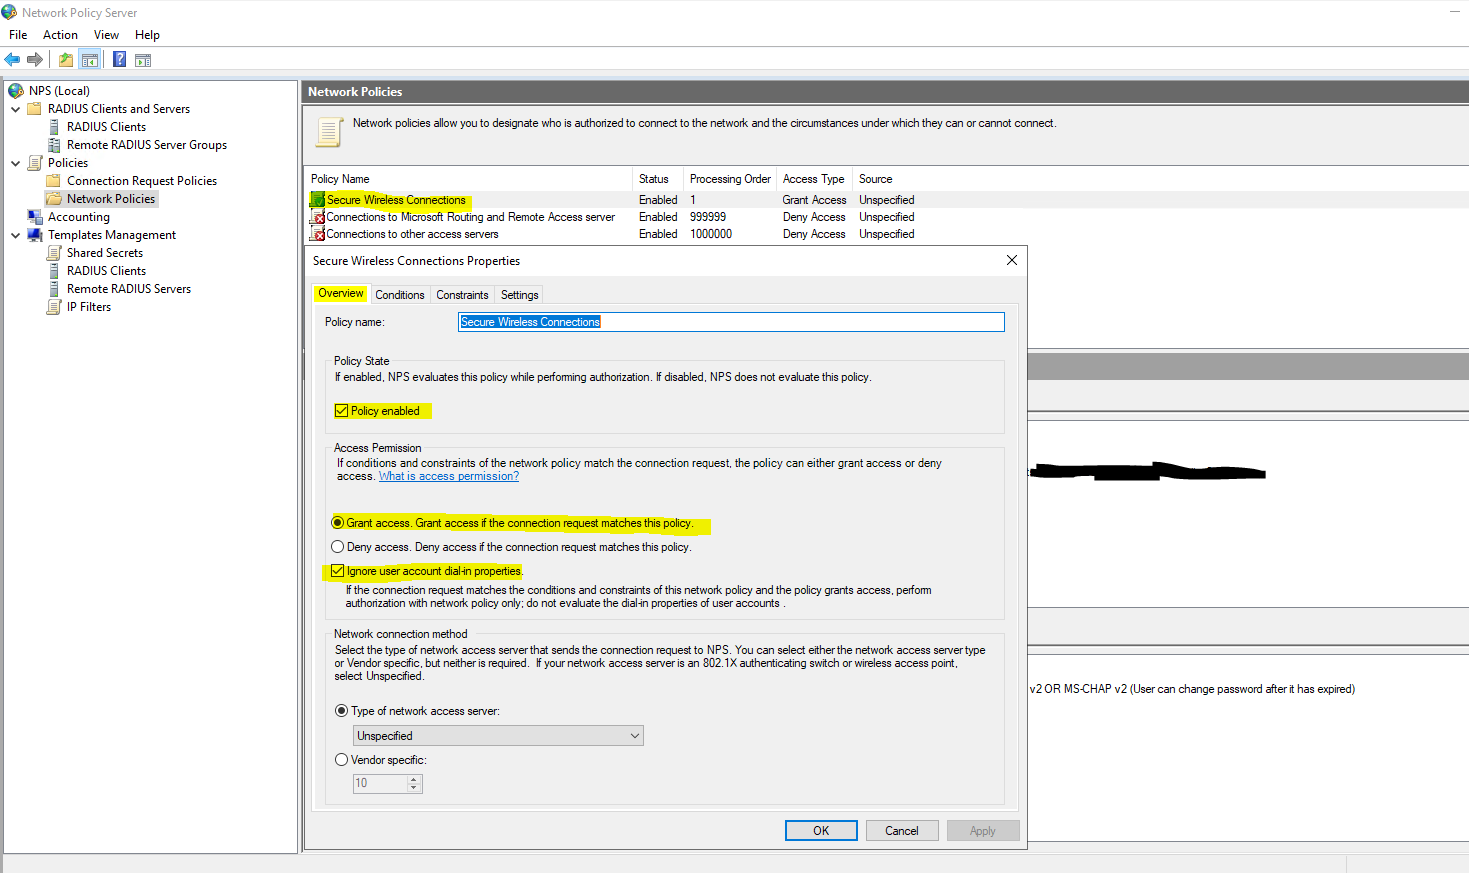
The wizard created our Network Policy and we do not need to change here anything.
By adding Windows Groups, it doesn’t matter if they were local groups on the server itself or domain groups, NPS will process both of them.
As mentioned further above you can use here the default computer certificate on the NPS server from your internal PKI.
The clients needs to trust that certificate, otherwise the user’s wont be able to connect to the wireless network.
Protected Extensible Authentication Protocol (PEAP)
https://en.wikipedia.org/wiki/Protected_Extensible_Authentication_Protocol
PEAP is similar in design to EAP-TTLS, requiring only a server-side PKI certificate to create a secure TLS tunnel to protect user authentication, and uses server-side public key certificates to authenticate the server.It then creates an encrypted TLS tunnel between the client and the authentication server. In most configurations, the keys for this encryption are transported using the server’s public key. The ensuing exchange of authentication information inside the tunnel to authenticate the client is then encrypted and user credentials are safe from eavesdropping.
Configure your WLAN Access Points
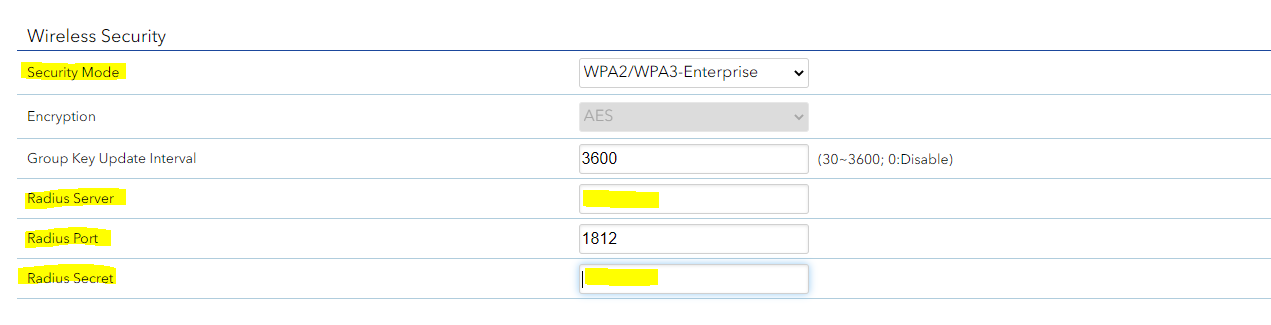
On the wlan access points we have to configure the IP address from the NPS (RADIUS) server, port and shared secret.
For my access points I will use here from Netgear the WAX218 WiFi 6 WLAN Access Point which is cost effective and intended for heavy internet traffic plus supports a huge amount of connected devices up to 256. This model is meanwhile discontinued by Netgear but a similar model is still available with the WAX620.
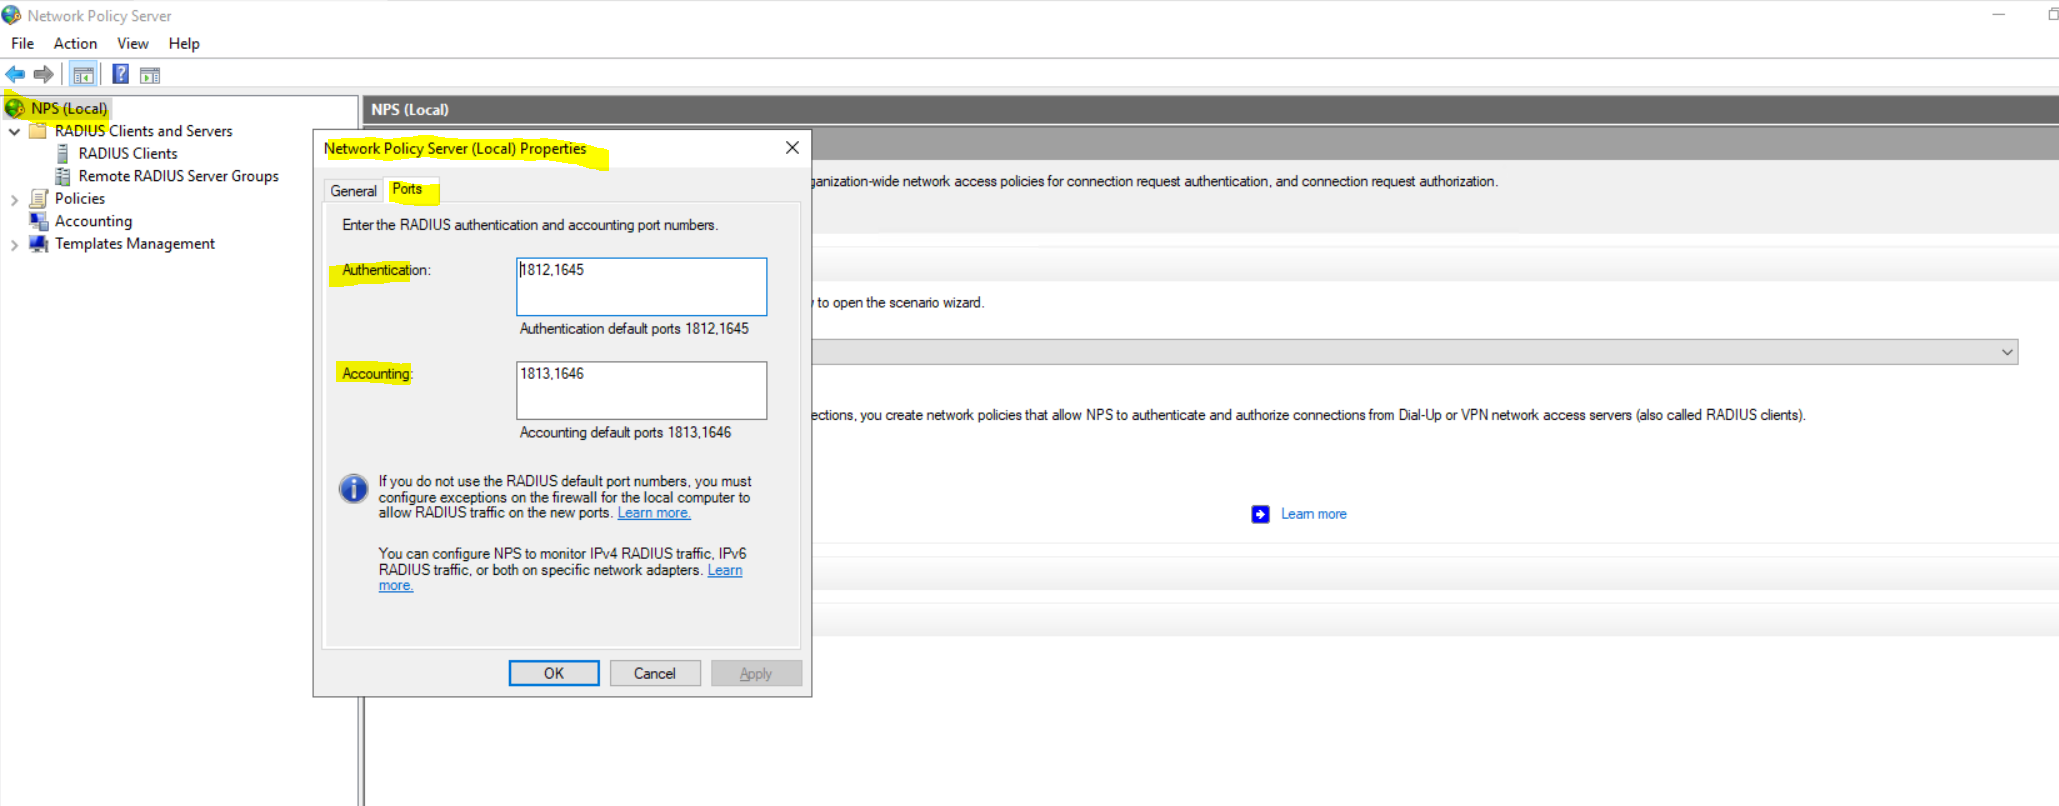
The Radius Port for authentication by default is UDP 1812 or 1645.
Further we need to select a security mode our access points will use to authenticate users or devices (computer authentication as mentioned further above). When using a RADIUS server we want that users authenticate themselves by using their username and password for the network, therefore we need to select WPA2 or WPA3-Enterpise, also for computer authentication.
Keep in mind that even in the year 2022 not all devices support WPA3.
You can check the ports in the NPS console by right clicking on NPS(Local) and select properties. Here within the tab Ports, you can see on what ports the NPS server is listening for authentication and if used accounting.
The Radius Port for accounting by default is UDP 1813 or 1646.
Optionally we can also configure Radius Accounting as mentioned.

The RADIUS server also collects a variety of information sent by the NAS that can be used for accounting and for reporting on network activity. The RADIUS client sends information to designated RADIUS servers when the User logs on and logs off. The RADIUS client may send additional usage information on a periodic basis while the session is in progress. The requests sent by the client to the server to record logon/logoff and usage information are generally called accounting requests.
For more information on RADIUS accounting, see RFC 2866.
Source: https://learn.microsoft.com/en-us/windows/win32/nps/ias-radius-authentication-and-accounting
Configure Wireless Network (IEEE 802.11) Policies | Wi-Fi profiles
You can configure group policies in your network to define preferred networks and settings for the WLAN connection to your clients.
To activate default Wireless Network (IEEE 802.11) Policies
https://docs.microsoft.com/en-us/windows-server/networking/core-network-guide/cncg/wireless/e-wireless-access-deployment#to-activate-default-wireless-network-ieee-80211-policies
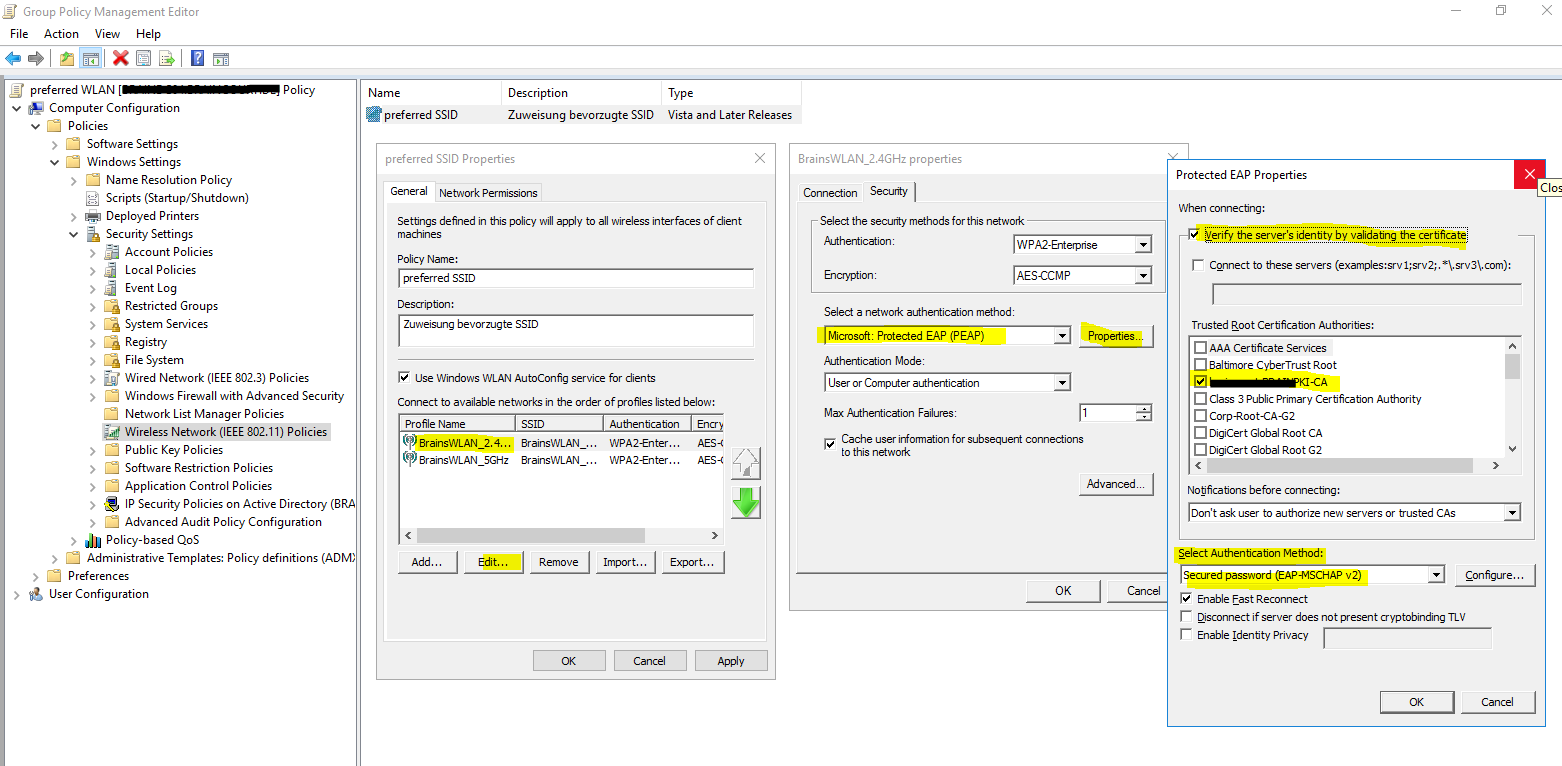
Computer Configuration -> Policies -> Windows Settings -> Security Settings -> Wireless Network (IEEE 802.11) Policies
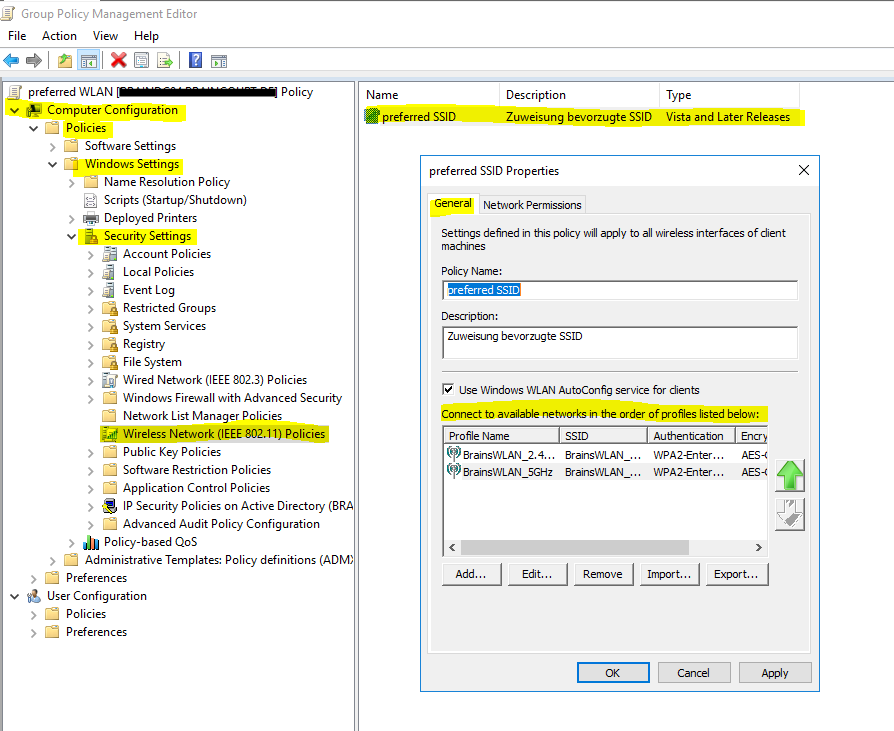
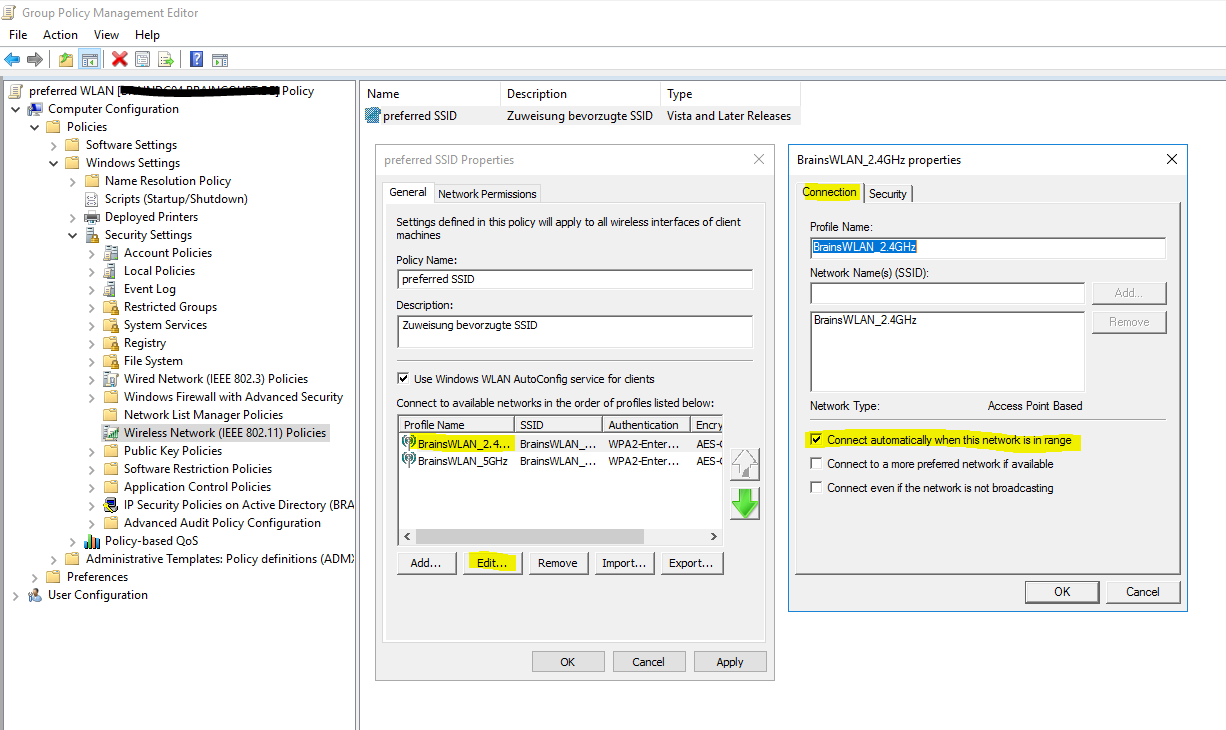
Clients should connect automatically to this network when it is in range.
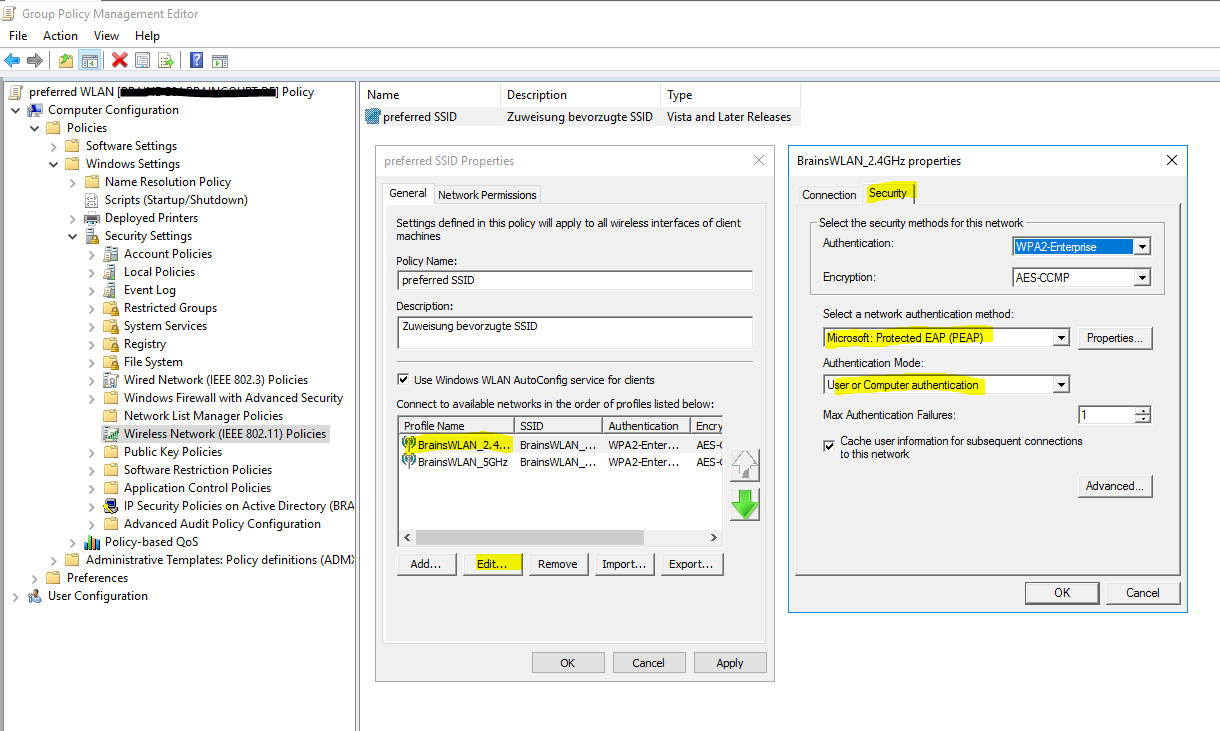
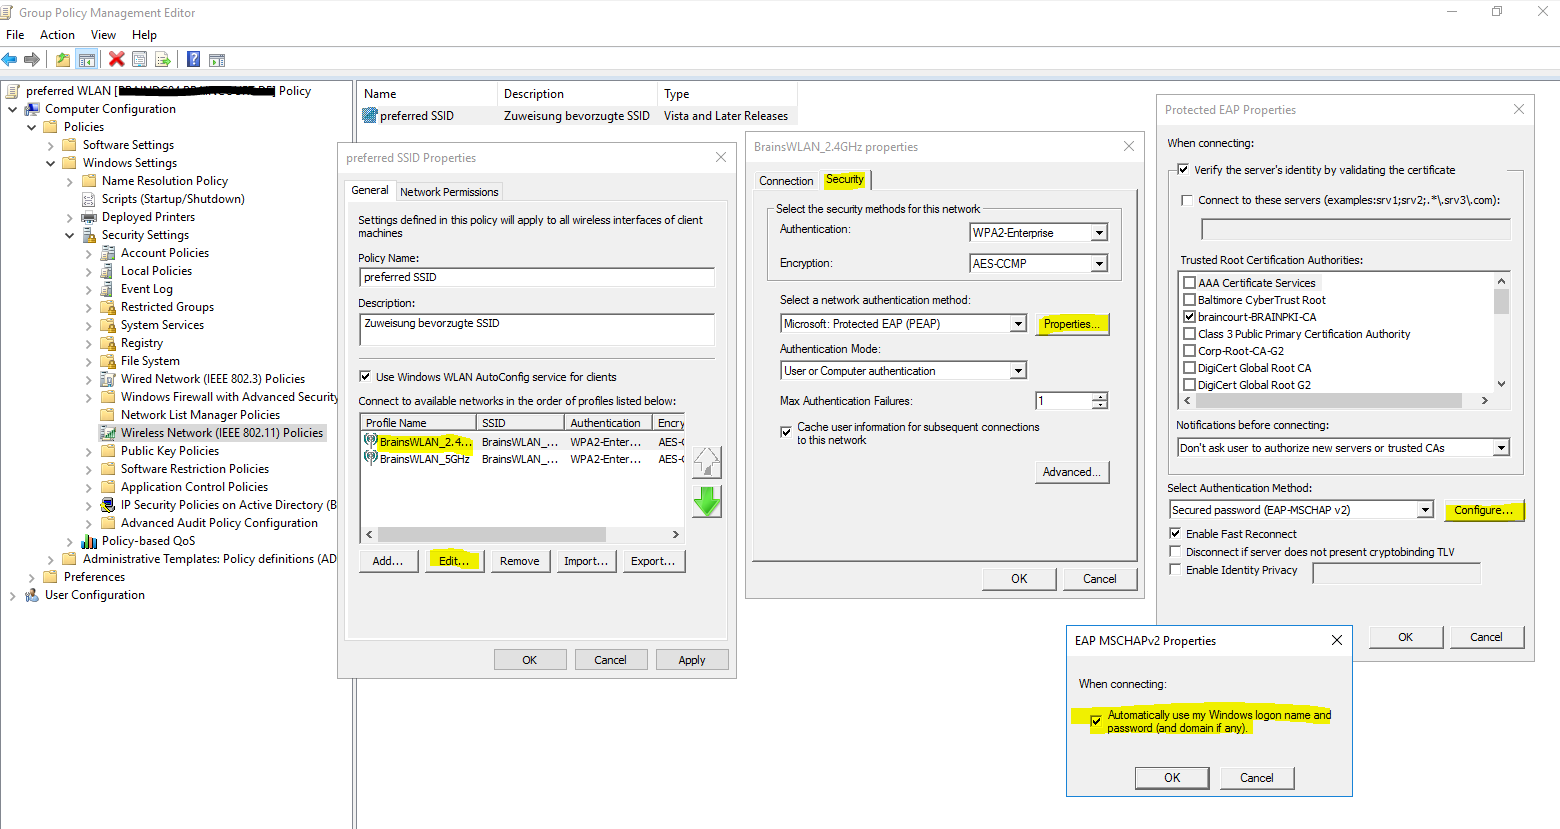
For the network authentication method I have to select Protected EAP (PEAP) as used on the NPS server and for the authentication mode I will use User or Computer authentication.
Even the most common method of authentication with PEAP-MSCHAPv2 is user auth, in which clients are prompted to enter their domain credentials, the Windows NPS server role also supports computer authentication by using the PEAP-MSCHAPv2 protocol.
In order to use computer authentication, you also have to install a computer certificate on the clients and issued from your internal PKI as mentioned further above.
For computer authentication you can configure certificate auto-enrollment for the client computers as shown in my following post: https://blog.matrixpost.net/configure-certificate-auto-enrollment/
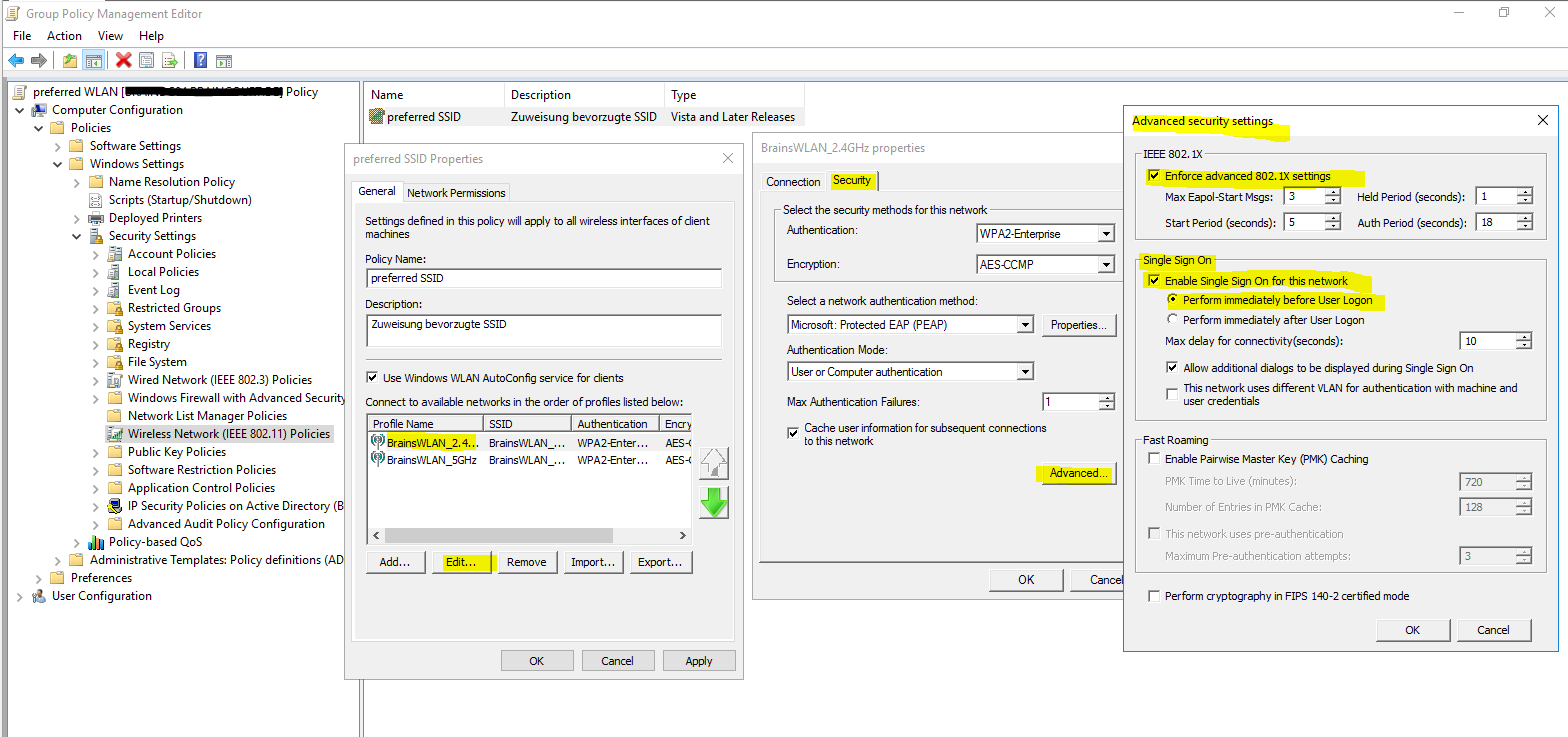
In the advanced settings you can enable single sign-on for the wireless network, by checking this your password to logon to your computer will also be passed and used to establish the wireless connection with the access points.
Further if you select Perform immediately before User Logon as show in the figure below, the computer will first try to connect to the wireless access points when the user is entering its password and then subsequently will get logged on to its computer after the wireless connection is established.
In case computer authentication will be performed, the computer already connects at the logon screen to the network, as it doesn’t matter which user will get logged on.
Therefore in both cases the computer can perform a network login against the domain controllers and logon scripts and group policies will be applied to the computer.
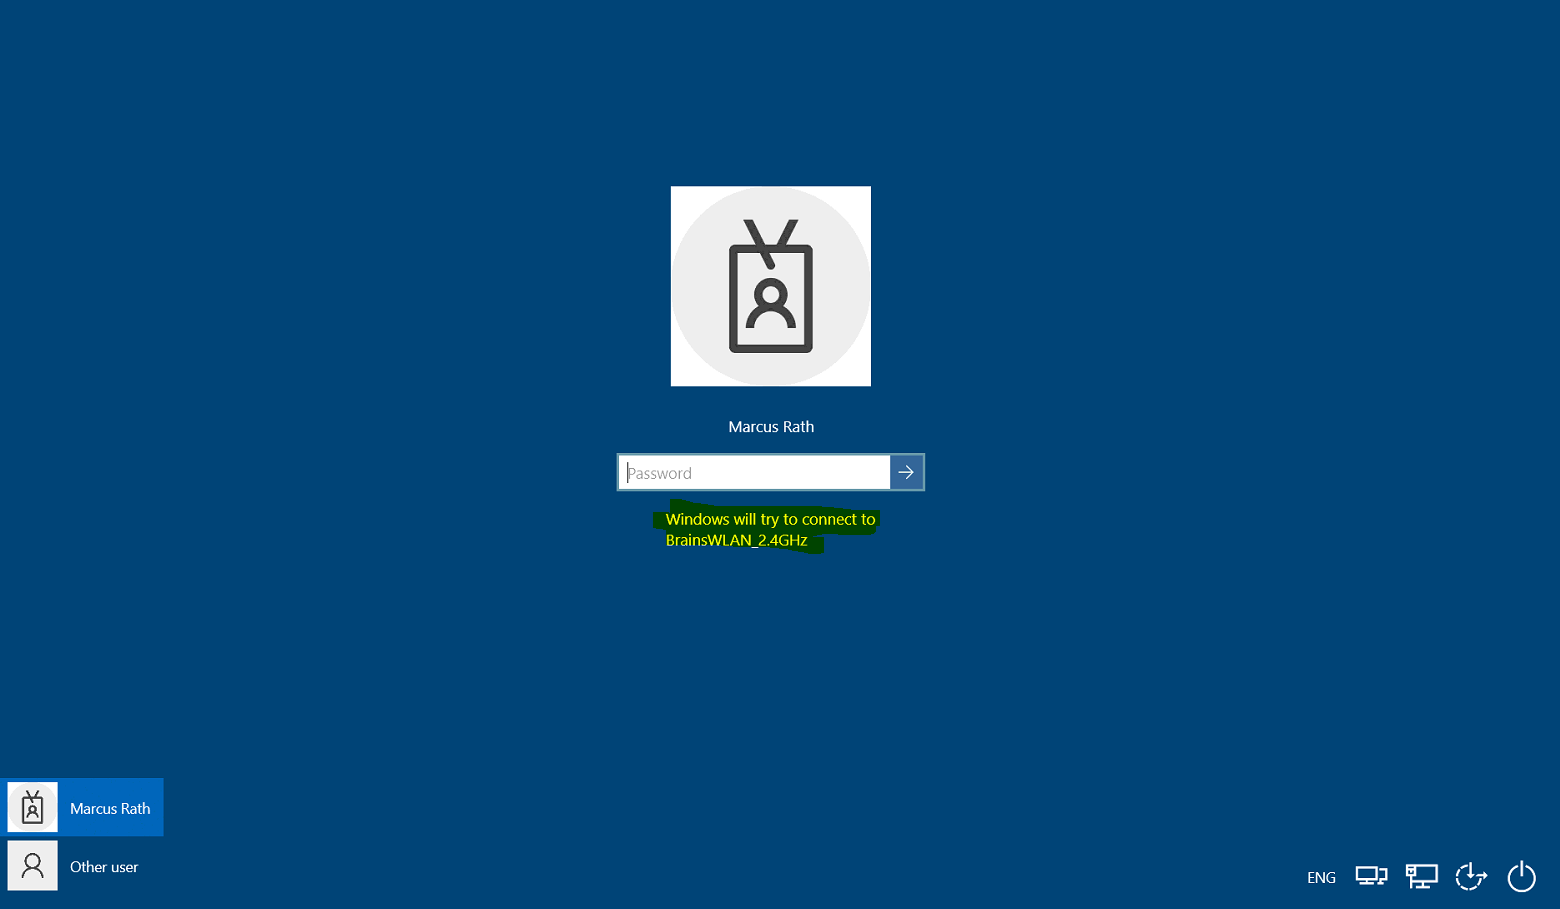
If the wireless connection couldn’t be established, the user will get logged on to its computer by using the local cached credentials as usual but without processing the logon scripts and applying the group policies from the domain controller.
At the logon screen you will see the wireless network to which Windows tries to connect after providing your password for the logon.
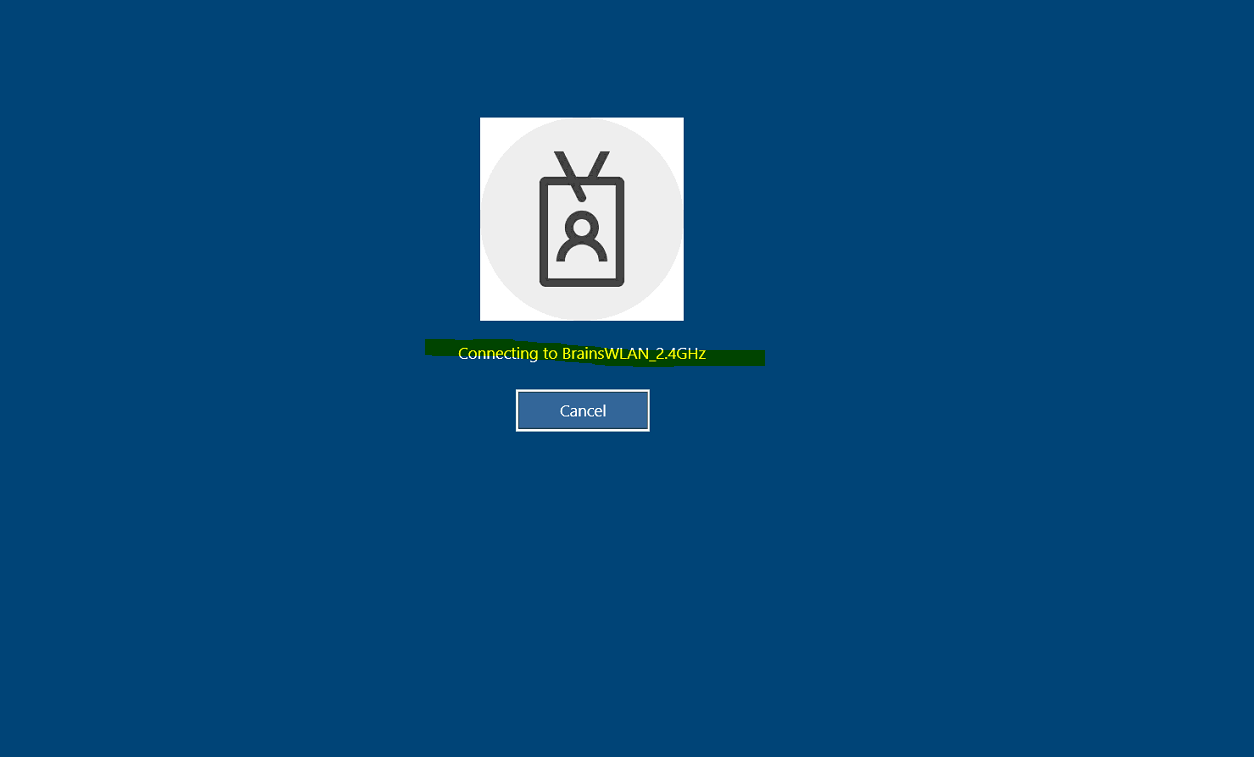
User vs. Machine Authentication
The most common method of authentication with PEAP-MSCHAPv2 is user auth, in which clients are prompted to enter their domain credentials. It is also possible to configure RADIUS for machine authentication, in which the computers themselves are authenticated against RADIUS, so the user doesn’t need to provide any credentials to gain access. Machine auth is typically accomplished using EAP-TLS, though some RADIUS server options do make it simple to accomplish machine auth using PEAP-MSCHAPv2 (including Windows NPS, as outlined in the example config below).
The following example configuration outlines how to set up Windows NPS as a RADIUS server, with Active Directory acting as a userbase:
Add the Network Policy Server (NPS) role to Windows Server.
Add a trusted certificate to NPS.
Add APs as RADIUS clients on the NPS server.
Configure a policy in NPS to support PEAP-MSCHAPv2.
(Optional for machine auth) Deploy PEAP-MSCHAPv2 wireless network settings to domain member computers using Group Policy.
Source: https://documentation.meraki.com/MR/Encryption_and_Authentication/Configuring_RADIUS_Authentication_with_WPA2-Enterprise
Create Wi-Fi profiles using the System Center Configuration Manager (SCCM) or Microsoft Intune.
You can also use SCCM or Microsoft Intune to configure Wi-Fi profiles. This topic is well documented from Microsoft in the following articles.
Create Wi-Fi profiles
https://docs.microsoft.com/en-us/mem/configmgr/protect/deploy-use/create-wifi-profiles
Deploy resource access profiles in Configuration Manager
https://docs.microsoft.com/en-us/mem/configmgr/protect/deploy-use/deploy-wifi-vpn-email-cert-profiles
Add and use Wi-Fi settings on your devices in Microsoft Intune
https://docs.microsoft.com/en-us/mem/intune/configuration/wi-fi-settings-configure
Manage Wi-Fi profiles on local computer by using the netsh command
You can also use the netsh command line tool to manage the Wi-Fi profiles on a local computer.
Netsh is a command-line scripting utility that allows you to display or modify the network configuration of a computer that is currently running. Netsh commands can be run by typing commands at the netsh prompt and they can be used in batch files or scripts. Remote computers and the local computer can be configured by using netsh commands.
Source: https://docs.microsoft.com/en-us/windows-server/networking/technologies/netsh/netsh-contexts
- netsh wlan show profile -> list profiles located on the local computer
- netsh wlan show profiles interface=”wi-fi” -> list profile for specific interface
- netsh wlan show drivers -> list driver information about the wireless adapter
- netsh wlan show wirelesscapabilities -> list capabilities of the wireless adapter
- netsh wlan show interfaces -> list all wireless interfaces on the local computer
- netsh wlan show profile name=”myAP” key=clear -> will display the security key in plaintext
- netsh wlan set profileparameter name=”myAP” connectionmode=manual -> will disable connect automatically
- netsh wlan set profileparameter name=”myAP” connectionmode=auto -> will enable connect automatically
- netsh wlan delete profile name=”myAP” -> will delete the myAP wlan profile
- netsh wlan delete profile name=* -> will delete all wlan profiles on the local computer
- netsh wlan export profile name=”WiFiNetwork” key=clear folder=”C:\path\” key=clear -> Export a wlan profile
- netsh wlan add profile filename=”C:\path\profileFile.xml” user=all -> Import a wlan profile for all user’s -> user=current only for the current user
- netsh wlan show wlanreport -> will create a wireless adapter report will ->
Analyze the wireless network report
https://support.microsoft.com/en-us/windows/analyze-the-wireless-network-report-76da0daa-1db2-6049-d154-7bb679eb03ed
Native Wifi
https://docs.microsoft.com/en-us/windows/win32/nativewifi/portal
The Native Wifi automatic configuration component configures, connects to, and disconnects from wireless networks. Native Wifi can store profiles on the networks it interacts with in the form of XML documents.
Troubleshooting
In case something went wrong and your clients won’t connect to the the wireless network, you can investigate several logs to get more details about the problem.
You can search in two locations for logs to investigate the reason why clients can’t connect to the network.
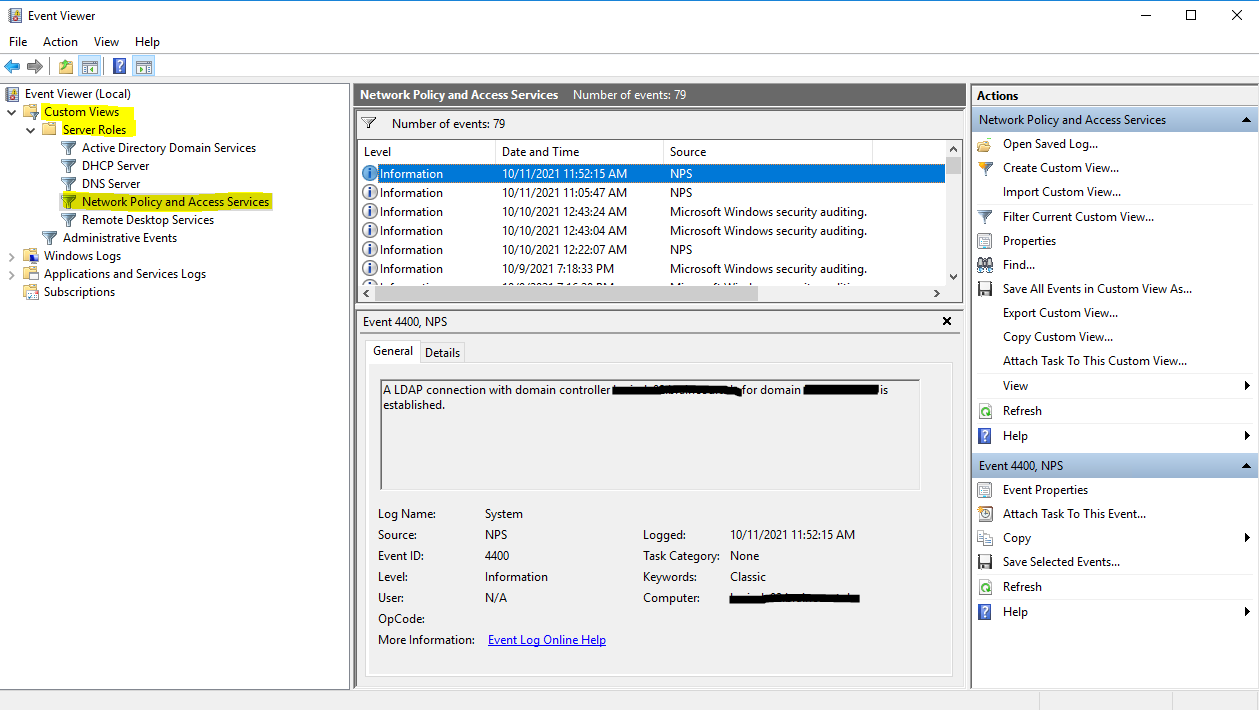
For general configuration problems between the NPS server and the RADIUS clients, you can investigate the Event Viewer.
Custom Views -> Server Roles -> Network Policy and Access Services
For problems regarding authentication from the user’s itself, you should use the Accounting logs. Here you can see the default path from them.
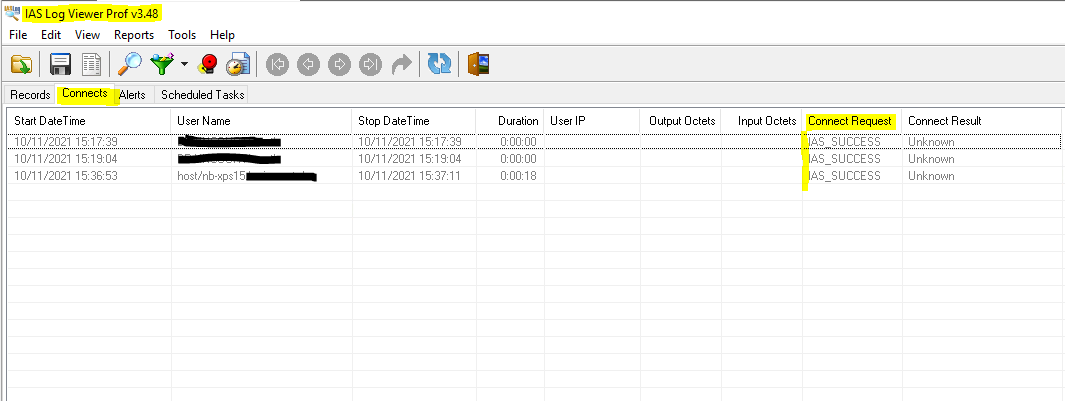
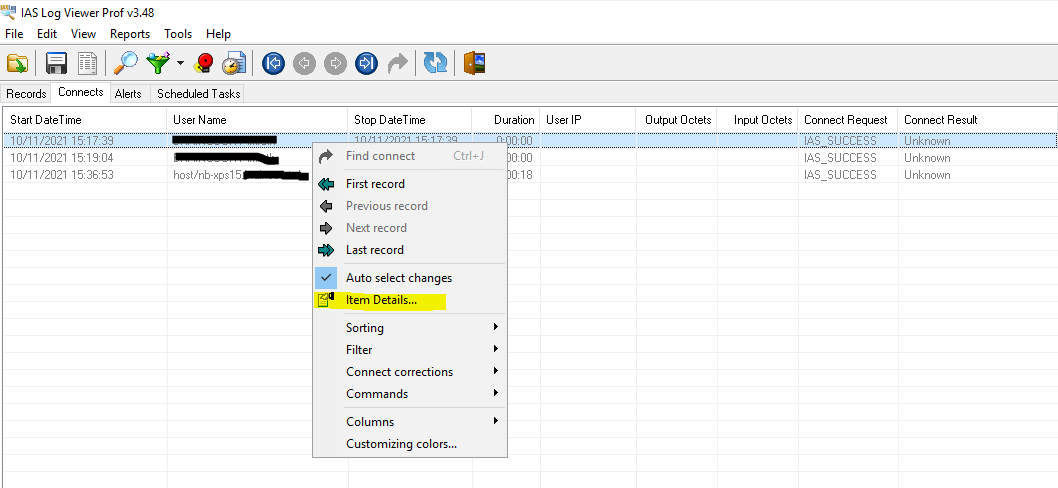
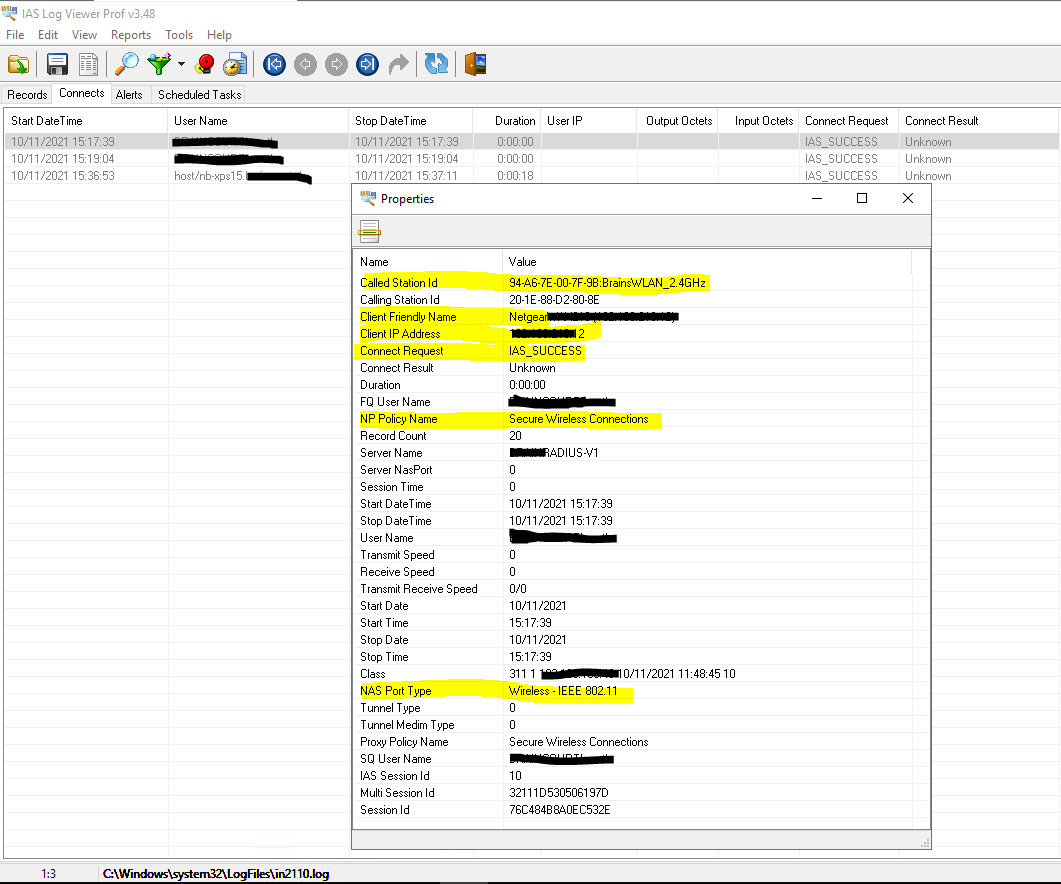
To investigate them I would suggest to use a specific log viewer like the IAS Log Viewer from DeepSoftware LLC. You can use this viewer also to investigate VPN logging from the Windows Routing and Remote Access servers.
IAS Log Viewer
https://www.deepsoftware.com/iasviewer/
IAS_SUCCESS -> the user or computer authenticated successfully against the NPS server, formerly Internet Authentication Service (IAS)
NPAS replaces the Internet Authentication Service (IAS) from Windows Server 2003.
Therefore you will see IAS_SUCCESS messages in the logs from NPS.
Source: https://en.wikipedia.org/wiki/Network_Policy_Server
Reason for rejecting a user. Can be:
Field (26) Reason-Code Number
- 0 = IAS_SUCCESS
- 1 = IAS_INTERNAL_ERROR
- 2 = IAS_ACCESS_DENIED
- 3 = IAS_MALFORMED_REQUEST
- 4 = IAS_GLOBAL_CATALOG_UNAVAILABLE
- 5 = IAS_DOMAIN_UNAVAILABLE
- 6 = IAS_SERVER_UNAVAILABLE
- 7 = IAS_NO_SUCH_DOMAIN
- 8 = IAS_NO_SUCH_USER
- 16 = IAS_AUTH_FAILURE
- 17 = IAS_CHANGE_PASSWORD_FAILURE
- 18 = IAS_UNSUPPORTED_AUTH_TYPE
- 32 = IAS_LOCAL_USERS_ONLY
- 33 = IAS_PASSWORD_MUST_CHANGE
- 34 = IAS_ACCOUNT_DISABLED
- 35 = IAS_ACCOUNT_EXPIRED
- 36 = IAS_ACCOUNT_LOCKED_OUT
- 37 = IAS_INVALID_LOGON_HOURS
- 38 = IAS_ACCOUNT_RESTRICTION
- 48 = IAS_NO_POLICY_MATCH
- 64 = IAS_DIALIN_LOCKED_OUT
- 65 = IAS_DIALIN_DISABLED
- 66 = IAS_INVALID_AUTH_TYPE
- 67 = IAS_INVALID_CALLING_STATION
- 68 = IAS_INVALID_DIALIN_HOURS
- 69 = IAS_INVALID_CALLED_STATION
- 70 = IAS_INVALID_PORT_TYPE
- 71 = IAS_INVALID_RESTRICTION
- 80 = IAS_NO_RECORD
- 96 = IAS_SESSION_TIMEOUT
- 97 = IAS_UNEXPECTED_REQUEST
Source: https://www.radiusreporting.com/IAS-DB-Attribute-Format-Table.html
EAP authentication exchange for wireless clients through the access point and RADIUS server stuck by using a route-based IPSec in pfSense during the SSL handshake and here exactly after the Client Hello
If you ran into that issue, you can read my following post about how to set up a lean Branch Office Network without any Servers and DCs inside by using an IPSec S2S VPN Tunnel connected with the Headquarters Network.
Links
Simplifying WPA2-Enterprise and 802.1x
https://www.securew2.com/solutions/wpa2-enterprise-and-802-1x-simplified
What’s In Store With WPA3-Enterprise?
https://www.securew2.com/blog/whats-in-store-with-wpa3
Internet Authentication Service & Network Policy Server
https://docs.microsoft.com/en-us/windows/win32/nps/internet-authentication-service-vs-network-policy-server
IAS Log Viewer
https://www.deepsoftware.com/iasviewer/
Microsoft IAS RADIUS Attribute IDs (Standard Log Format Only)
https://www.radiusreporting.com/IAS-Standard-Attribute-Table.html
Wireless Access Deployment
https://docs.microsoft.com/en-us/windows-server/networking/core-network-guide/cncg/wireless/e-wireless-access-deployment
To activate default Wireless Network (IEEE 802.11) Policies
https://docs.microsoft.com/en-us/windows-server/networking/core-network-guide/cncg/wireless/e-wireless-access-deployment#to-activate-default-wireless-network-ieee-80211-policies
Wireless Deployment Recommendations and Best Practices
https://docs.microsoft.com/en-us/previous-versions/windows/it-pro/windows-xp/bb457091(v=technet.10)?redirectedfrom=MSDNDeployment of Protected 802.11 Networks Using Microsoft Windows
https://docs.microsoft.com/en-us/previous-versions/windows/it-pro/windows-xp/bb457068(v=technet.10)
Remote Authentication Dial-In User Service (RADIUS)
https://en.wikipedia.org/wiki/RADIUS
IEEE 802.1X
https://en.wikipedia.org/wiki/IEEE_802.1X
IEEE 802.1
https://en.wikipedia.org/wiki/IEEE_802.1
IEEE 802.11
https://en.wikipedia.org/wiki/IEEE_802.11
Extensible Authentication Protocol (EAP)
https://en.wikipedia.org/wiki/Extensible_Authentication_Protocol
The best home for modern WordPress sites built on the Google Cloud Platform