Set up SFTP Chroot Jail
If you want to lock user’s they want to upload, download and edit files from a web root directory, so that they cannot access folders outside from that, you can set up a SFTP Chroot Environment on your Linux server.
For this post I will use Ubuntu 20.04.3 LTS with OpenSSH version 8.2p1
OpenSSH supports since version 4.9p1 out of the box to set up a Chroot-Environment.
To determine the OpenSSH version on your server you can use:
ssh -v localhost
First we need to configure SSH, so open the /etc/ssh/sshd_config file. By default the subsystem SFTP part will looks like this on Ubuntu.
# override default of no subsystems
Subsystem	sftp	/usr/lib/openssh/sftp-server

# Example of overriding settings on a per-user basis
#Match User anoncvs
#	X11Forwarding no
#	AllowTcpForwarding no
#	PermitTTY no
#	ForceCommand cvs server
To tell OpenSSH to lock user’s from a specific group, I will create here a group named sftp, for which user’s inside this group, should be locked aka chrooted to a specific folder.
So adjust the /etc/ssh/sshd_config file as follows.
# override default of no subsystems
#Subsystem sftp	/usr/lib/openssh/sftp-server

Subsystem sftp internal-sftp

# Example of overriding settings on a per-user basis
#Match User anoncvs

	Match Group sftp
	ChrootDirectory %h
	ForceCommand internal-sftp
	X11Forwarding no
	AllowTcpForwarding no

#	PermitTTY no
#	ForceCommand cvs server
First I commented the line with the default subsystem libraries to avoid the need for installing additional libraries (dedicated standalone sftp server).
OpenSSH: Difference between internal-sftp and sftp-server
Subsystem sftp /usr/lib/openssh/sftp-server
Subsystem sftp internal-sftpBoth sftp-server and internal-sftp are part of OpenSSH. The sftp-server is a standalone binary. The internal-sftp is just a configuration keyword that tells sshd to use the SFTP server code built-into the sshd, instead of running another process (what would typically be the sftp-server).
The internal-sftp was added much later (OpenSSH 4.9p1 in 2008?) than the standalone sftp-server binary. But it is the default by now. The sftp-server is now redundant and is kept probably for a backward compatibility.
Source: https://serverfault.com/questions/660160/openssh-difference-between-internal-sftp-and-sftp-server
The next two lines with
Match Group sftp
ChrootDirectory %h
will force all user’s from the sftp group to be locked (chrooted) to its own home directory.
The line
ForceCommand internal-sftp
will force OpenSSH again to use the internal sftp server code built-into sshd, instead of running another process like the standalone sftp-server.
X11 Forwarding will support to open graphical programs like browsers, GUI text editors and more by using a SSH terminal like putty, for our case we do not need and want to enable them. Further down we also deny for the user in general to access a shell or terminal.
AllowTcpForwarding will allow you to tunnel local application ports from the client to the server or vice versa through the SSH tunnel.
Create the User and Group
Next I will create a user and group they should be locked to our web root folder as follow.
# addgroup sftp
# useradd -m -s /bin/false -G sftp sftpuser01
The -m option will create the user’s home directory and the -s option will set the user’s shell to the folder path /bin/false and therefore will prevent the user from accessing the shell.
-G will add our sftpuser01 to our previously created sftp group.
We also have to set a password for the sftpuser01 by executing
# passwd sftpuser01
In order to add still existing user’s to the sftp group, you can add them as follows
# usermod -G sftp user123
# usermod -s /bin/false user123
To determine in which groups a user is, you can use the following command
# groups sftpuser01
To list members of a group use
# getent group sftp
Adjust permissions for the Home Directory
We need to make the root user as owner for the home directory in order our user’s will be able to login to.
# chown root:root /home/sftpuser01
# chmod 0755 /home/sftpuser01
We will also create a new folder in the user’s home directory where it can upload, download and edit files for. Further we will set this user as owner for the directory and the group will be www-data, in which the user also named www-data is member and is running the apache2 webserver in Ubuntu.
# mkdir /home/sftpuser01/web
# chown sftpuser01:www-data /home/sftpuser01/web
You can determine the user which is running the apache2 webserver with the following commands:
# ps aux | egrep ‘(apache|httpd)’
or
# apachectl -S
From now on the user is able to access its folder but without the option to break out from its home directory.
Mount Web Root Directory to the Home Directory from the User
As we want to enable the user to upload, download and edit files within our web root directory, we finally need to mount that web root directory to the user’s previously created home directory and here to the created web folder.
In order that the user will be able to edit existing files and folders within the mounted web root directory, we will execute the chown command again and this time recursive.
#
# mount --bind /var/www/website /home/sftpuser01/web
#
# chown -R sftpuser01:www-data /home/sftpuser01/web
We will also ensure that new files and folders created in our folder web will inherit its group ID (setgid), rather than the primary group ID of the user who created the file, and therefore will set as owner the sftpuser01 and the group www-data by using the chmod g+s command.
#
# chmod g+s /home/sftpuser01/web

To remove the inheritance you have to execute the following command btw.
# chmod g-s /home/sftpuser01/web


The same for the user ID (setuid)
!!!!! can be configured on FreeBSD, other UNIX & Linux systems just ignore u+s !!!
# chmod u+s file
In case the web server apache2 needs to be able to write into some folders, you can permit write access to these folders for apache2 as follows.
# chmod g+w /home/sftpuser01/web/<Folder to be writeable>
Further that the mount will still exist after a reboot, we also add it to the /etc/fstab file.
#
/var/www/website /home/sftpuser01/web none bind 0 0
Troubleshooting
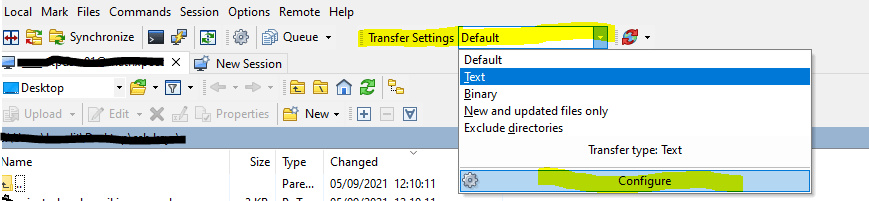
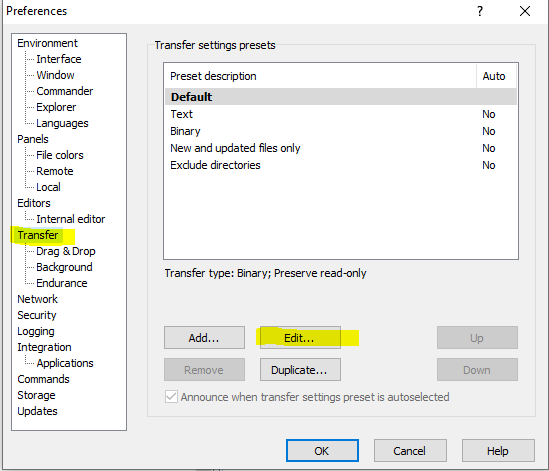
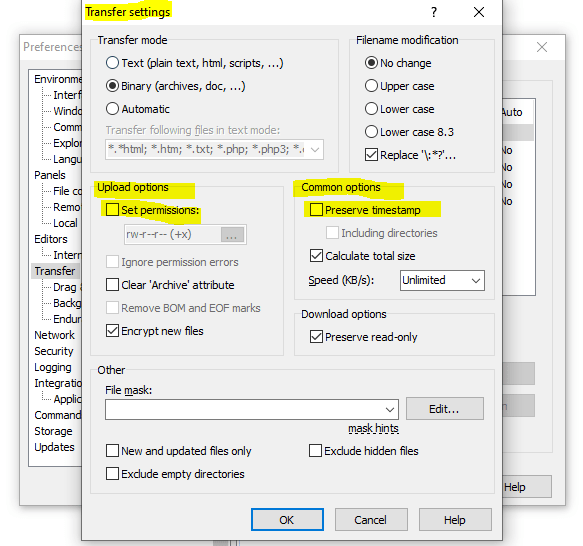
If you run into the following error by trying to change files with WinSCP.
Upload of file .. was successful, but error occurred while setting the permissions and/or timestamp. If the problem persists, turn off setting permissions or preserving timestamp. Alternatively you can turn on ‘Ignore permission errors’ option.
- On some systems (e.g. Linux), you need to be an owner of the file (write permissions are not enough) to modify its permissions or timestamp (you will see an error like “Permissions denied” in error details).
- Some servers do not support updating file timestamp or permissions at all (you will see an error like “The server does not support the operation” in error details).
- Some servers are set up to pickup any uploaded file immediately, process it somehow and delete or move it away. If the server is quick enough, it does that before WinSCP is able to update the file timestamp or permissions (you will see an error like “No such file or directory” in error details).
Whatever the reason is, you need to turn off Set permissions and Preserve timestamp options or turn on Ignore permission errors.
Source: https://winscp.net/eng/docs/message_preserve_time_perm
Links
chroot
https://en.wikipedia.org/wiki/Chroot
Understanding chroot Jail
https://www.thegeekdiary.com/understanding-chroot-jail/
Debootstrap
https://wiki.debian.org/Debootstrap
The best home for modern WordPress sites built on the Google Cloud Platform