Set up Fail2ban on Ubuntu 20.04.3 LTS
In this post I want to show how to install and use Fail2Ban on Ubuntu.
Fail2Ban is an intrusion prevention software framework that protects computer servers from brute-force attacks. Written in the Python programming language, it is able to run on POSIX systems that have an interface to a packet-control system or firewall installed locally, for example, iptables or TCP Wrapper.
Fail2Ban operates by monitoring log files (e.g. /var/log/auth.log, /var/log/apache/access.log, etc.) for selected entries and running scripts based on them. Most commonly this is used to block selected IP addresses that may belong to hosts that are trying to breach the system’s security. It can ban any host IP address that makes too many login attempts or performs any other unwanted action within a time frame defined by the administrator. Includes support for both IPv4 and IPv6.
Source: https://en.wikipedia.org/wiki/Fail2ban
Installation
$ sudo apt update
$ sudo apt install fail2ban
After that the service will start automatically what can be checked by using
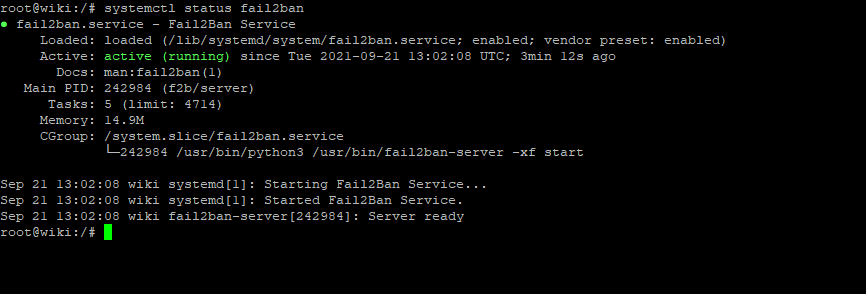
$ sudo systemctl status fail2ban
You can also see here that it runs in python.
You can also check if it is enabled as follows.
$ systemctl is-enabled fail2ban
If not you can enable fail2ban for autostart as follows.
$ sudo systemctl enable fail2ban
Configuration
The configuration from fail2ban you will find in the following two *.conf files
/etc/fail2ban/jail.conf
/etc/fail2ban/jail.d/defaults-debian.conf
You shouldn’t modify these files as they probably will be overwritten or improved in a distribution update.
Provide customizations in a jail.local file or a jail.d/customisation.local
Fail2ban will override the settings from the *.conf with*.local files.
Therefore I will first copy both files into the recommended *.local files as follows
$ sudo cp /etc/fail2ban/jail.conf /etc/fail2ban/jail.local
$ sudo cp /etc/fail2ban/jail.d/defaults-debian.conf /etc/fail2ban/jail.d/customisation.local
First I would white list all IPs fail2ban should ignore like your own internal or public IP address.
Therefore comment out the following entry in your /etc/fail2ban/jail.local and add your IPs by using a space or comma separator between them.
ignoreip = <your whitelist IPs comma seperated>
# "ignoreip" can be a list of IP addresses, CIDR masks or DNS hosts. Fail2ban
# will not ban a host which matches an address in this list. Several addresses
# can be defined using space (and/or comma) separator.
#ignoreip = 127.0.0.1/8 ::1
Also adjust the following settings in the /etc/fail2ban/jail.local file.
All time settings with no suffix means seconds, you can also use m = minutes, h = hours, d = days.
In order to permanently ban the IP addresses, you will need to change the bantime parameter value to -1
# "bantime" is the number of seconds that a host is banned.
bantime  = 10m

# A host is banned if it has generated "maxretry" during the last "findtime"
# seconds.
# This option is used together with the maxretry option. If a host exceeds the maxretry setting within the time period specified by the findtime option,
# it is banned for the length of time specified by the bantime option.
findtime  = 10m

# "maxretry" is the number of failures before a host get banned.
maxretry = 5
After each change you have to restart the fail2ban service in order the changes will kick in.
$ sudo systemctl restart fail2ban
If you want to test the ban for a user from your own computer and IP address you are connected before, check that ignoreself = false is set, by default it is true and enabled.
Be careful and only use this if you can connect also from a different IP to your system, otherwise you are locked out.
# "ignorself" specifies whether the local resp. own IP addresses should be ignored
# (default is true). Fail2ban will not ban a host which matches such addresses.
ignorself = false
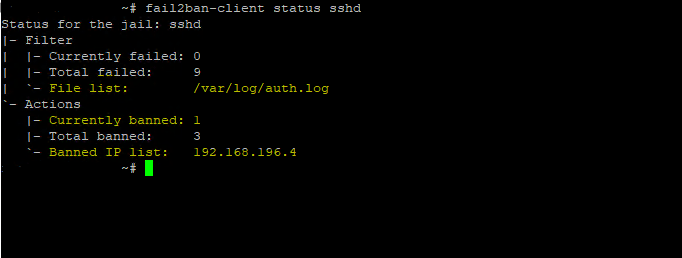
To show the banned IP addresses for SSH you can use the following command
$ sudo fail2ban-client status sshd
To unban IPs you can use the following command.
$ sudo fail2ban-client set <your jail list name> unbanip <your IP>
The name of the jail list can be determined by running
$ sudo fail2ban-client status
Here the output from Status for the jail: sshd (sshd is the name of this jail)
So to unban the IP 192.168.196.4 for the jail list sshd, I have to execute the following command:
$ sudo fail2ban-client set sshd unbanip 192.168.196.4

For fail2ban version before v0.8.8, you have to run the following command to unban an IP
$ sudo fail2ban-client get <your jail list name> actionunban <your IP>
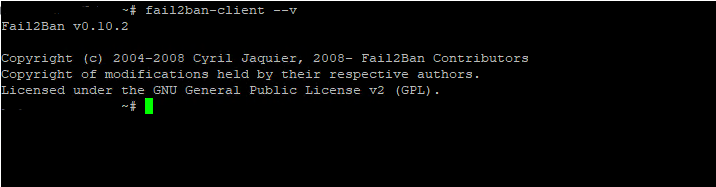
To determine your version you can use the following command
$ sudo fail2ban-client –v
If you use different ports for the specified service you want to use with fail2ban, you have to adjust them in the JAILS section from your jail.local file.
Under port is listed the default ports for these services, for ssh (port 22), http (port 80), https (port 443), smtp (port 25), …. and so on.
For example for the above configuration for SSH (sshd daemon), if you configure here to use the port 2222 on your SSH server instead of port 22 by default, you also have to replace ssh in fail2ban here with port 2222.
Fail2ban supports also other services besides SSH like Apache, Postfix, Dovecot or other services. You will find all of them in the JAILS section.
This is also the reason, why installation of Fail2ban makes sense, even if you use private public keys for your SSH connection plus PasswordAuthentication no, to secure other services on the system they still using username and password for authentication.
#
# JAILS
#

#
# SSH servers
#

[sshd]

# To use more aggressive sshd modes set filter parameter "mode" in jail.local:
# normal (default), ddos, extra or aggressive (combines all).
# See "tests/files/logs/sshd" or "filter.d/sshd.conf" for usage example and details.
#mode   = normal
port    = ssh
logpath = %(sshd_log)s
backend = %(sshd_backend)s


[dropbear]

port     = ssh
logpath  = %(dropbear_log)s
backend  = %(dropbear_backend)s


[selinux-ssh]

port     = ssh
logpath  = %(auditd_log)s


#
# HTTP servers
#

[apache-auth]

port     = http,https
logpath  = %(apache_error_log)s
By default only the sshd daemon is enabled for fail2ban. If you want to enable further services like Postfix and dovecot or the Apache web server, you need to enable them in your /etc/fail2ban/jail.d/customisation.local file as follows.
The names of the services you will find in the JAILS section above from /etc/fail2ban/jail.local
[sshd]
enabled = true

[apache-auth]
enabled = true

[postfix]
enabled = true

[dovecot]
enabled = true
Don’t forget to restart the fail2ban service afterwards
$ sudo systemctl restart fail2ban
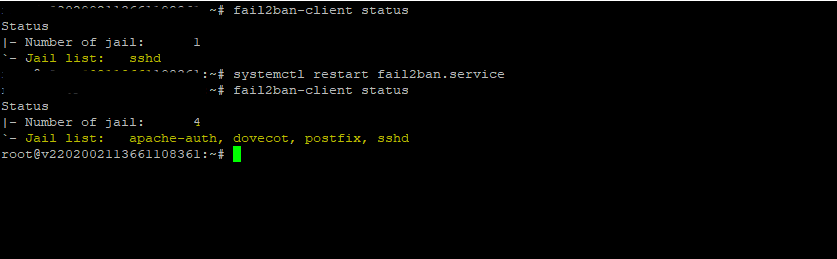
To check what services are enabled for fail2ban you can use
$ sudo fail2ban-client status
Here you can see in the screenshot below the first output before adding the above services, it will only list one jail for the sshd daemon and shows under number of jail only 1, after adding these services also to the /etc/fail2ban/jail.d/customisation.local file, I will get the following Jails and the number of jail is set to 4.
apache-auth
dovecot
postfix
sshd
!!! Note !!!
The apache-auth Jail will of course also include and ban failed .htaccess access attempts as they finally not be different from the authentication configuration directly inside the Apache config files and therefore also be logged in the default Apache logs.
The benefit from using a .htaccess file is to give developers access to configure those settings without the need to provide them access to the central Apache config file itself.
The Apache config file by default is the /usr/local/etc/httpd/httpd.conf file.
In Debian GNU/Linux distributions like Ubuntu this is the /etc/apache2/apache2.conf file.
More about authentication in Apache and .htaccess you will find in my following post.
Links
Fail2ban
http://www.fail2ban.org/wiki/index.php/Apache
Fail2ban
https://en.wikipedia.org/wiki/Fail2ban
The best home for modern WordPress sites built on the Google Cloud Platform